Site blog

When you work in a big environment, like me, and have lot of Azure DevOps organizations, is it time to automate some work to keep the environment strong. One thing that could be a hazzle is managing secrets.
This blog post describes steps needed to put up a flow
for notifications from key vault when secrets is on the way to expired (30
days), with Azure Logics Apps.
The event Microsoft.KeyVault.SecretNearExpiry is used. It´s trigged 30 days before the expiration date.
Prerequisites:
You need a existing key vault and a subscription in Azure.
Task 1: Connect to portal Azure
1. Start your web browser and connect to the following URL:
portal.azure.com
2. Log in with your credentials.
Task 2: Create a Logic App via Event Grid
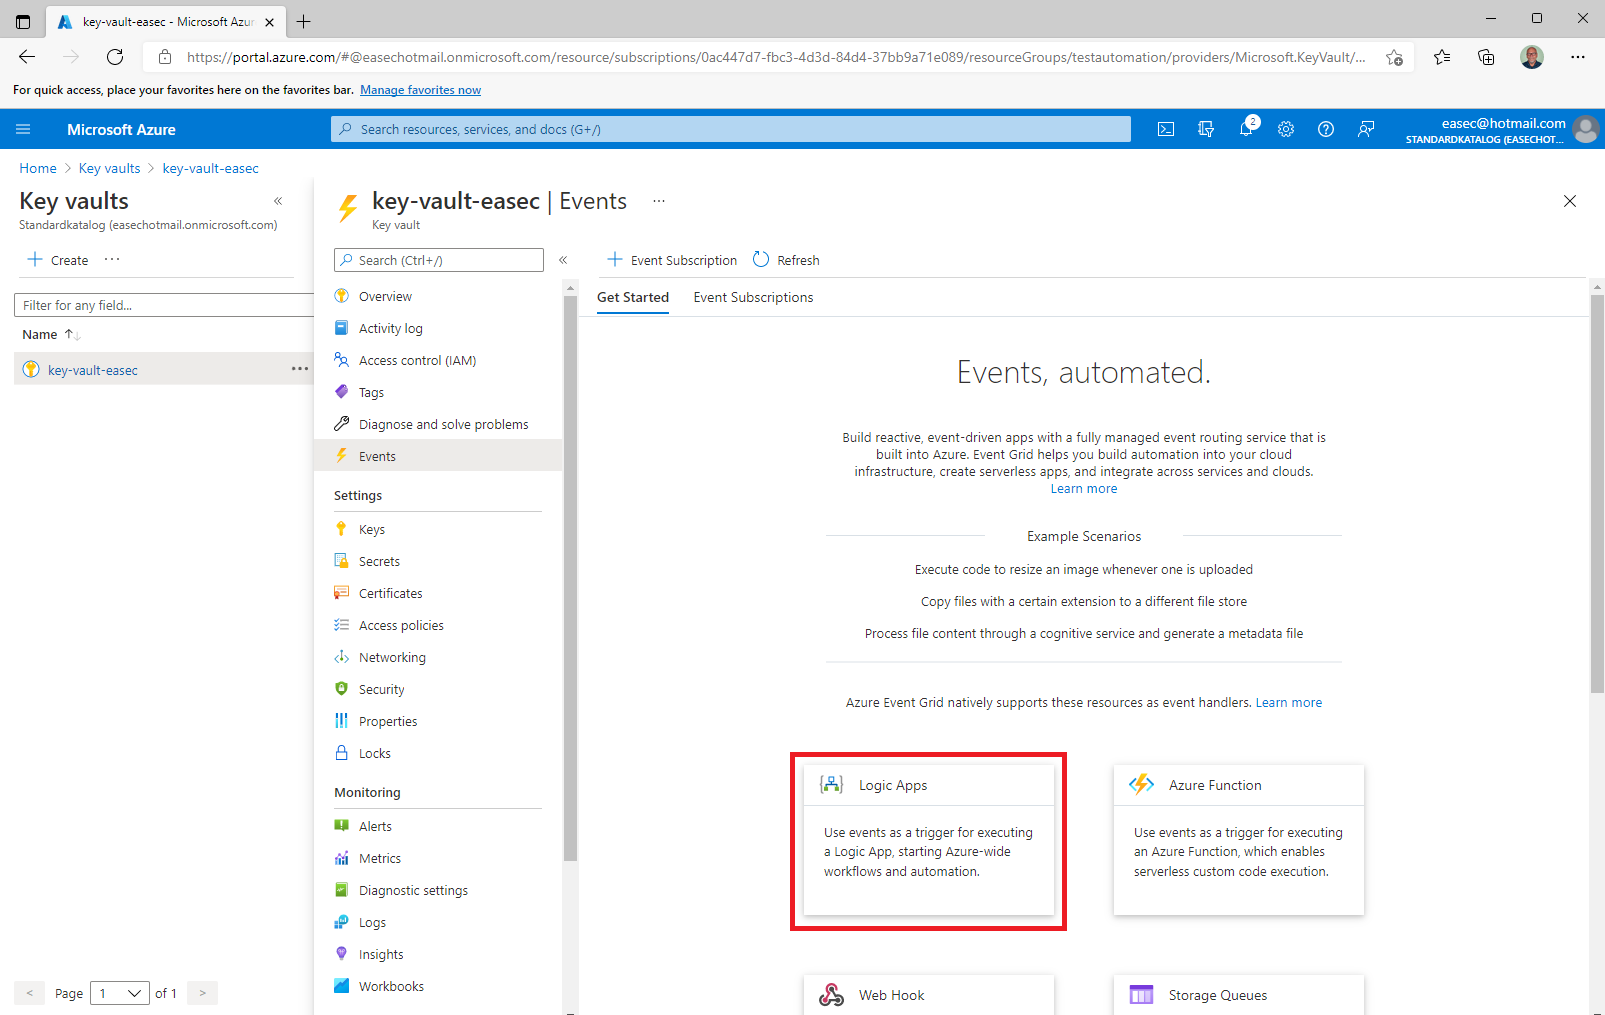
1. In the Azure portal, go to your key vault, select Events – Get Started and click Logic Apps.
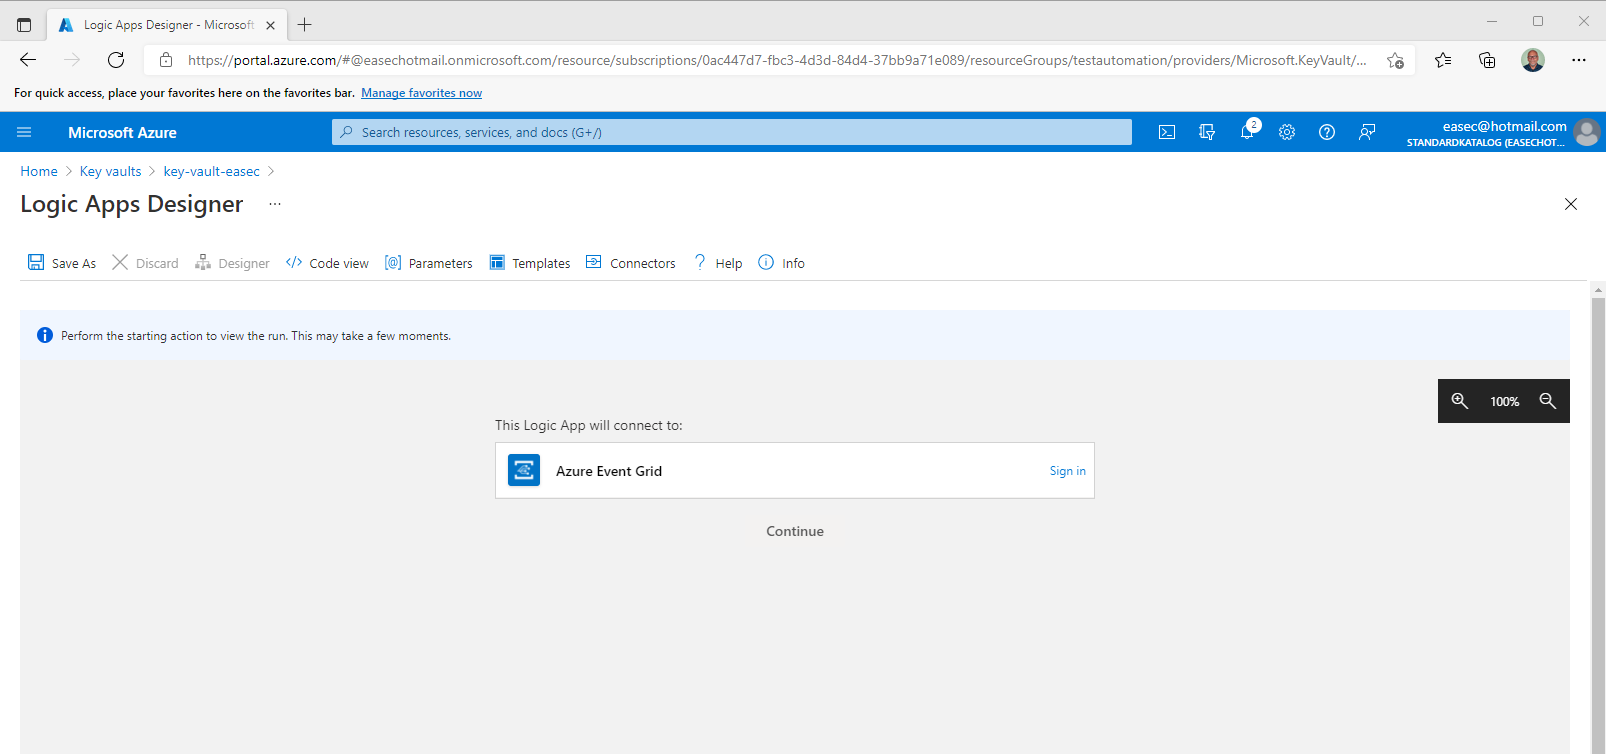
2. On Logic Apps Designer, click Sign in.
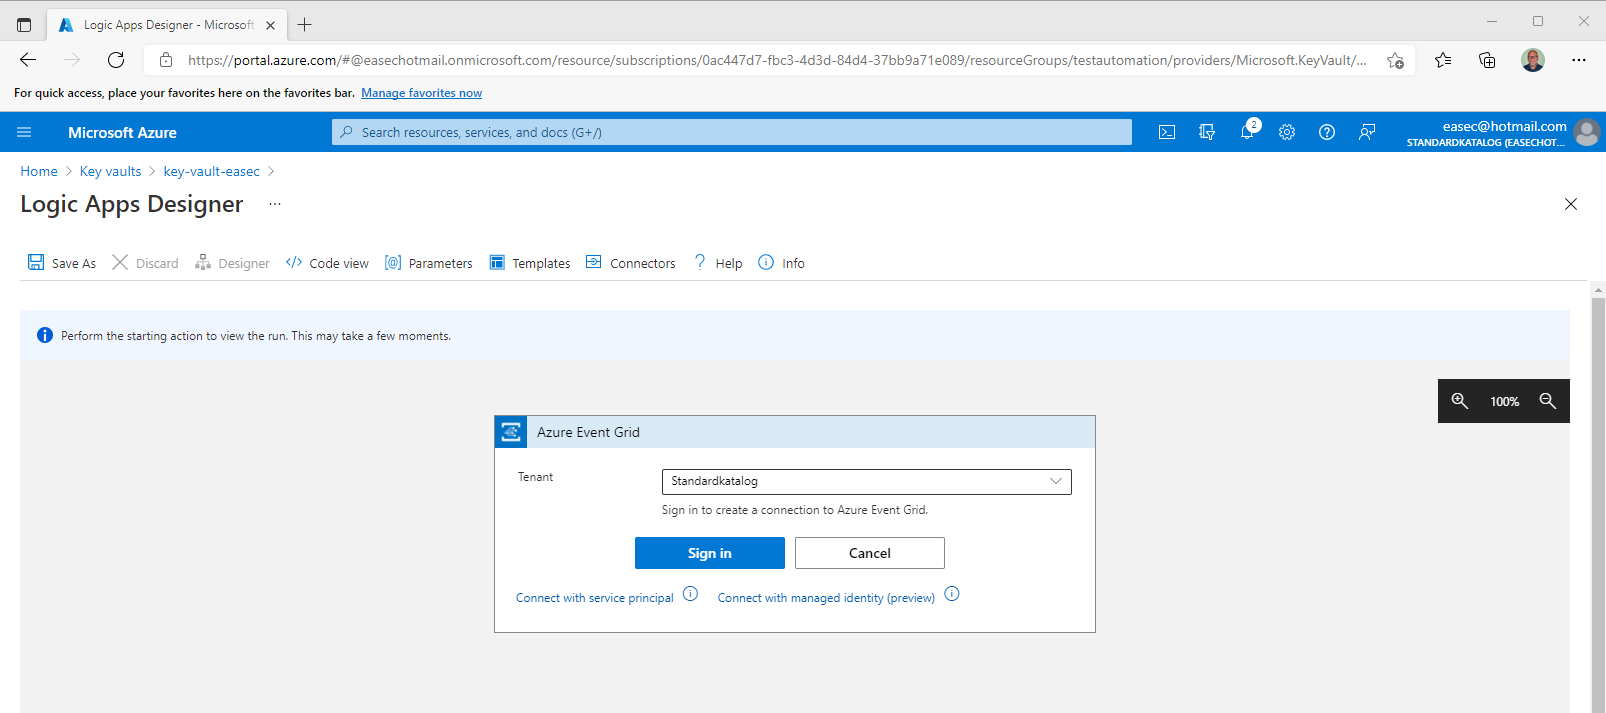
3. Choose your tenant and click on Sign in.
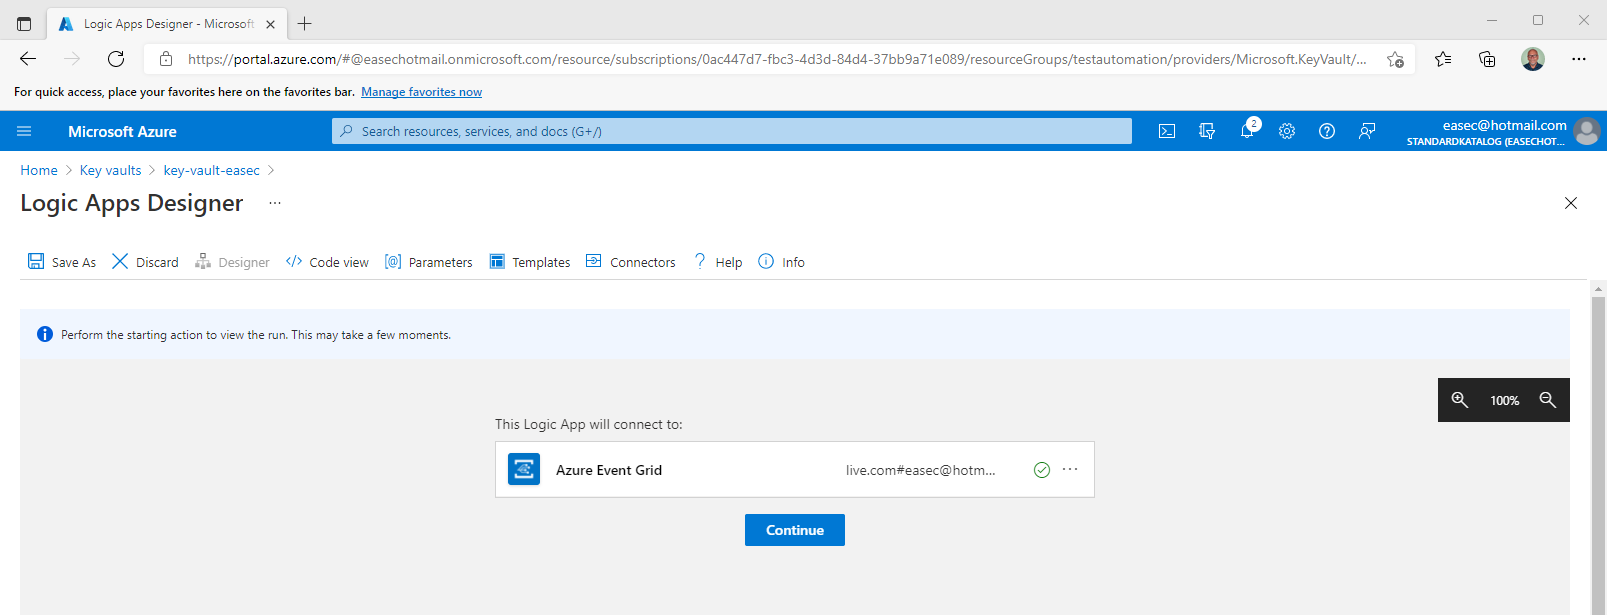
4. Choose your account, and the status is changed with that account. Click Continue.
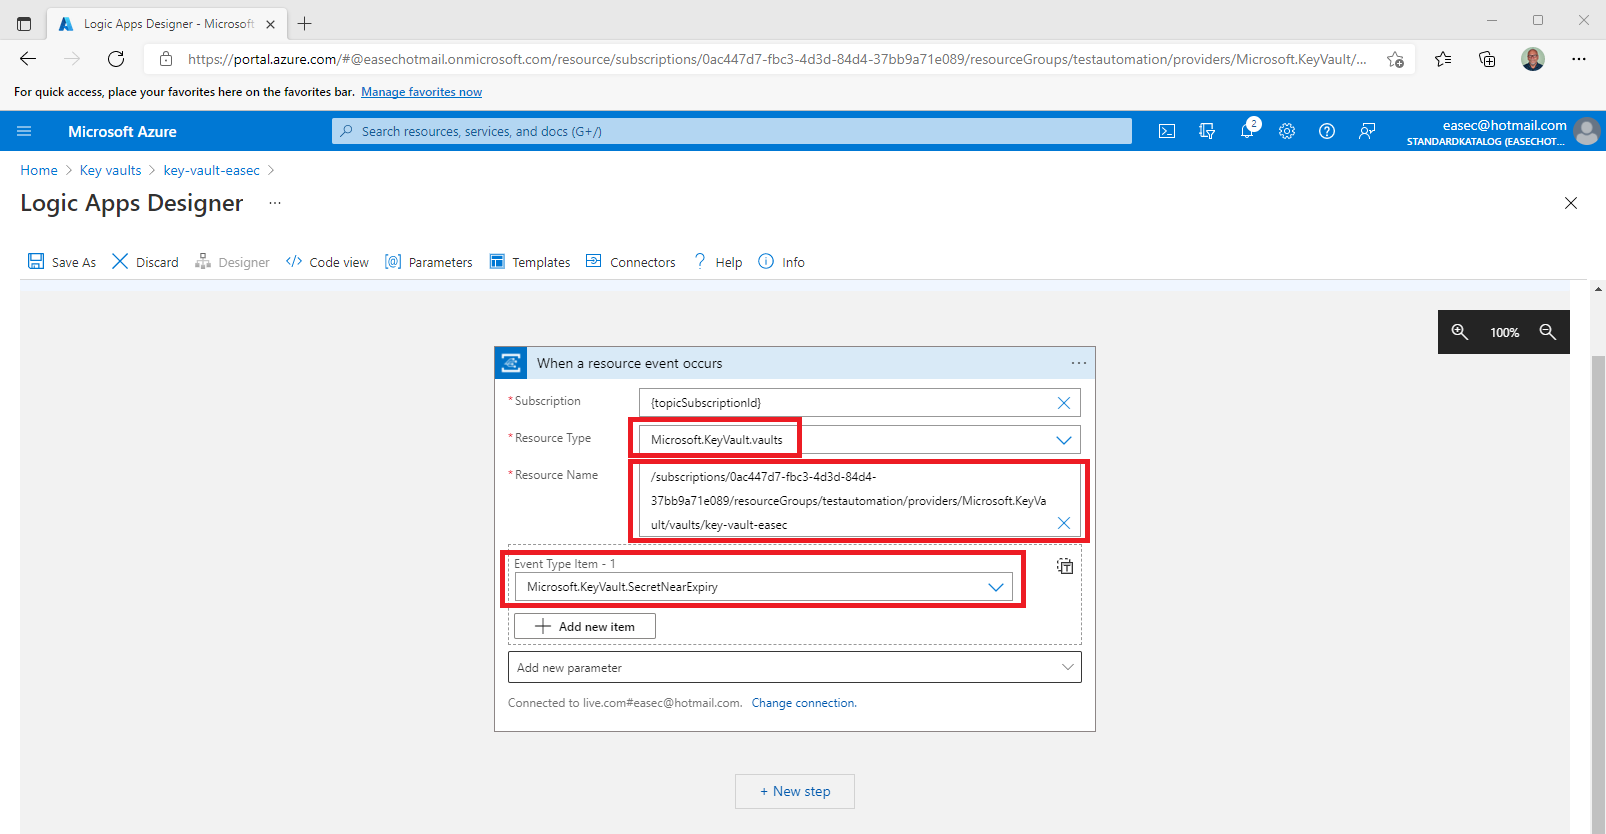
5. On the When a resource event occurs screen, do the following:
- Leave Subscription and Resource Name (will changes) as default.
- Select Microsoft.KeyVault.vaults for the Resource Type.
- Select Microsoft.KeyVault.SecretNearExpiry for Event Type Item - 1.
6. Click on + New Step. This will open a window to Choose an action.
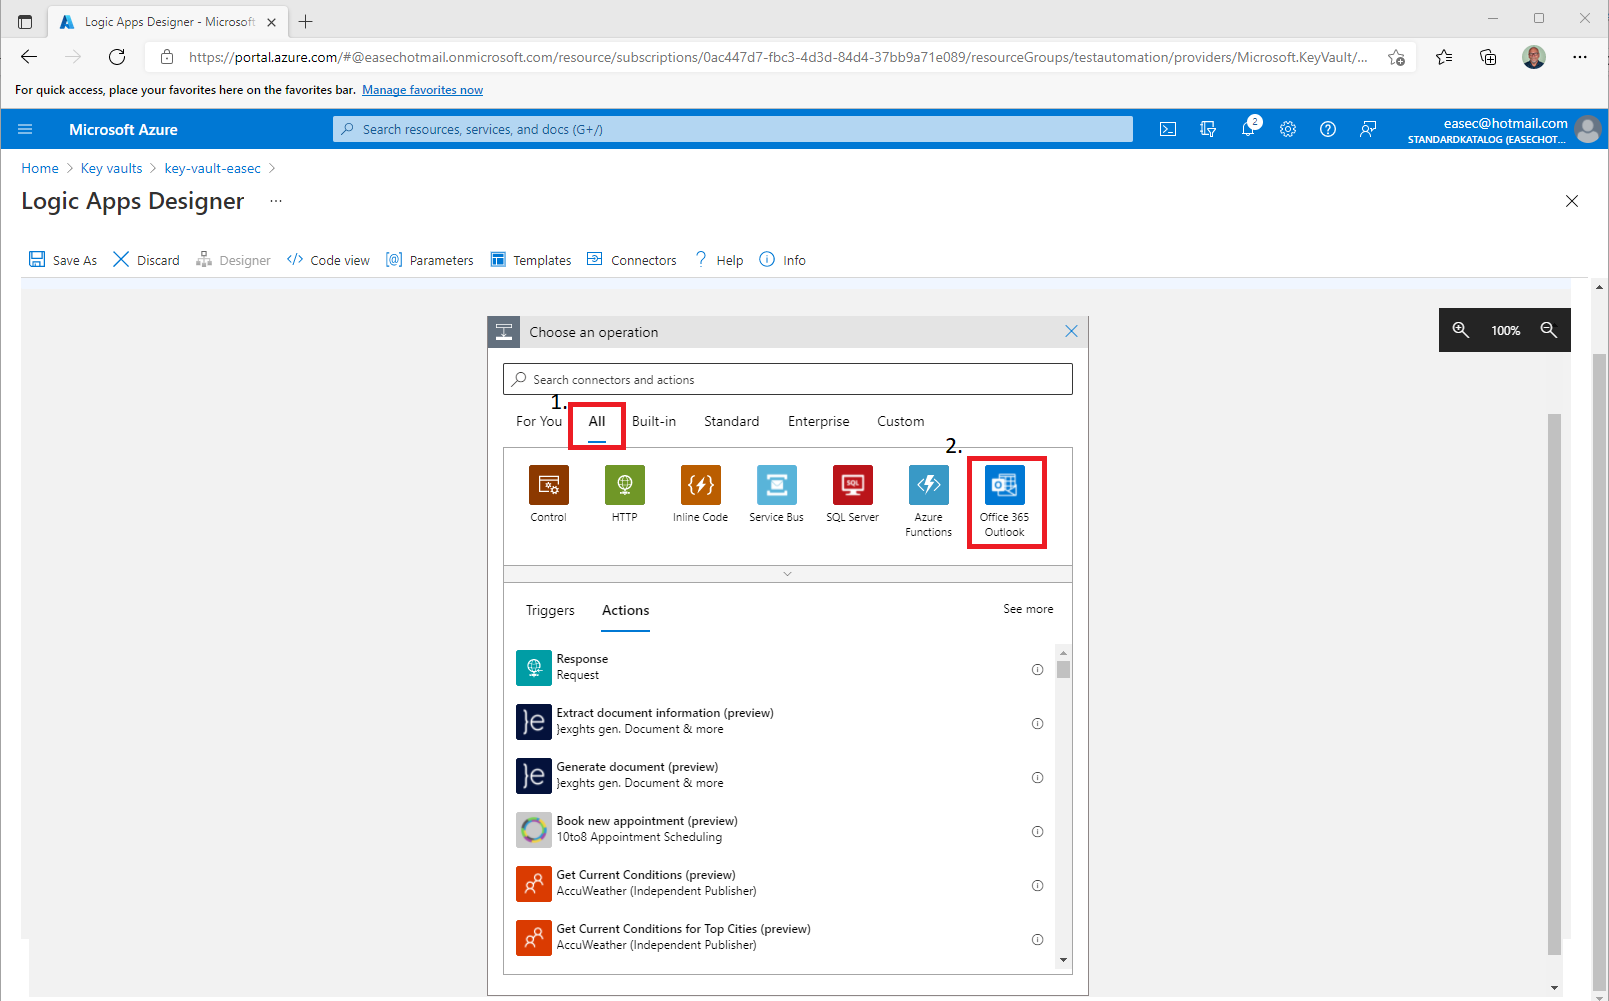
7. Click on All and choose Office 365 Outlook.
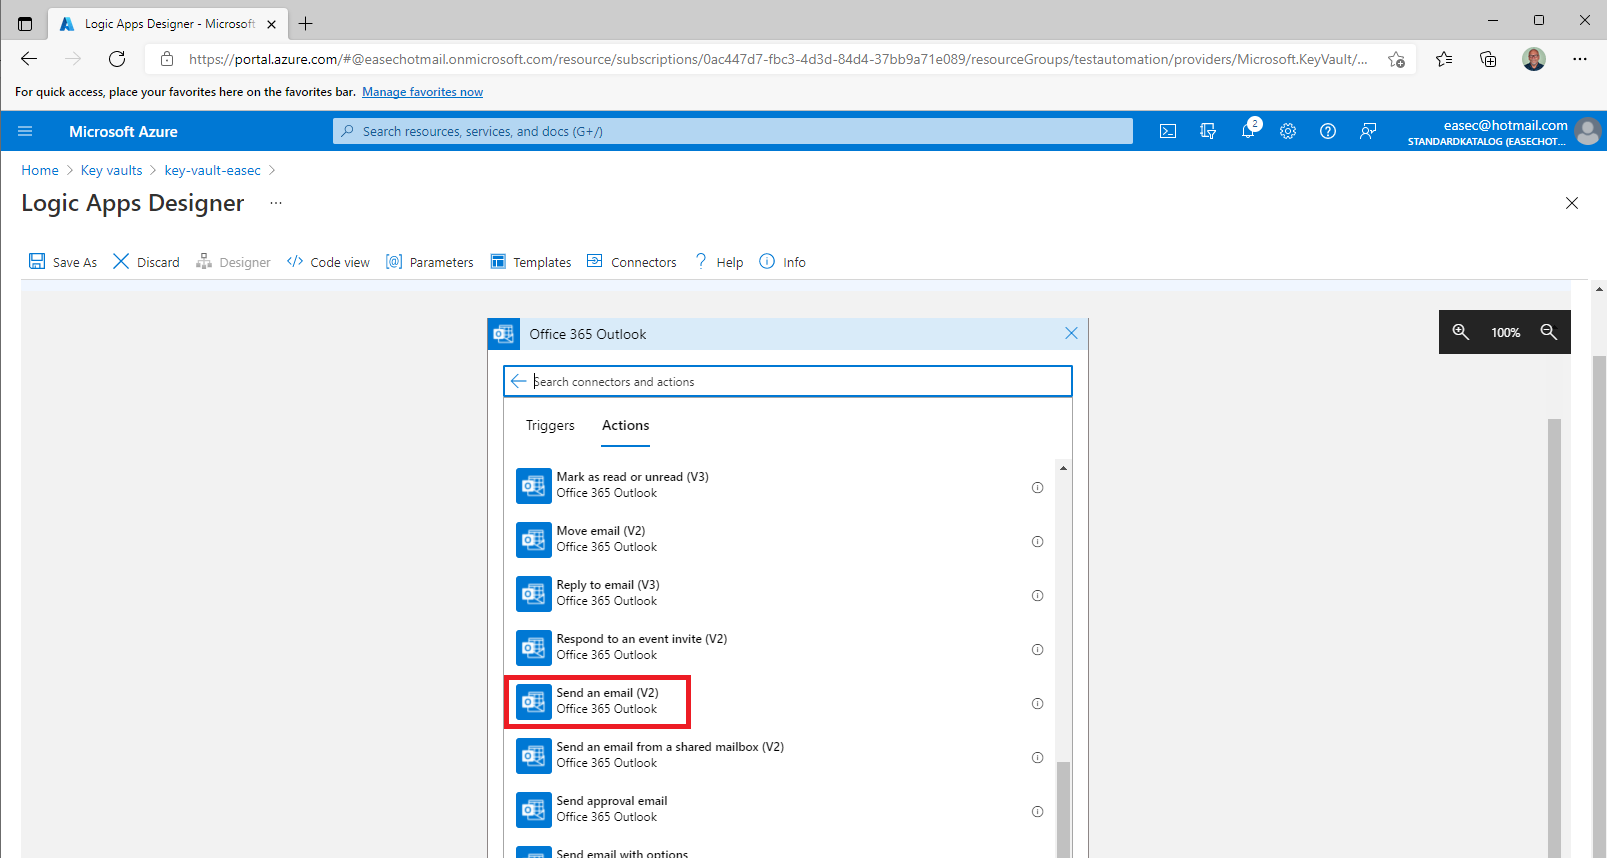
8. Select the Send an email (v2) action.
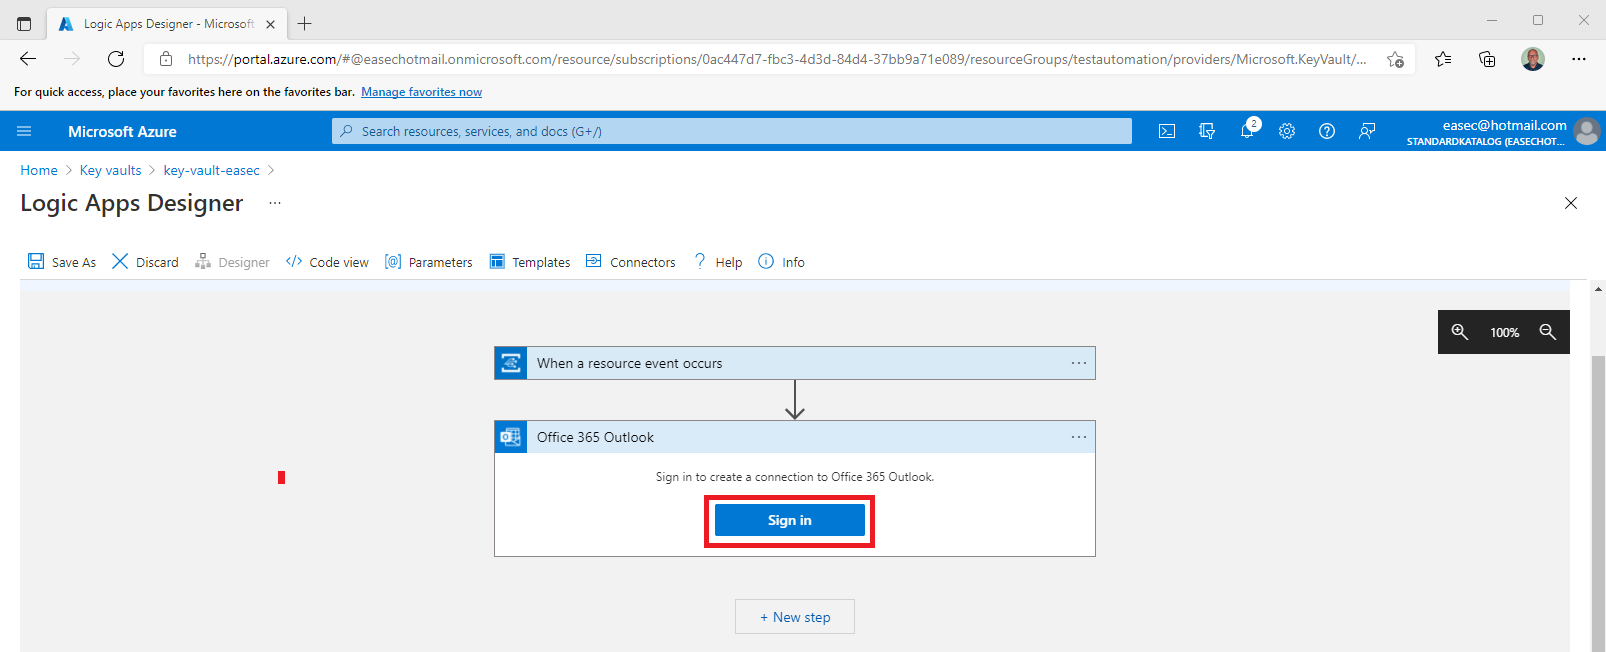
9. Click on Sign in. It´s the account used for sending notifications when secrets is about to expired. Should be a Microsoft 365 account in this case, you could choose other provider.
10. Build your template:
- To: Enter the email address to receive the notification emails.
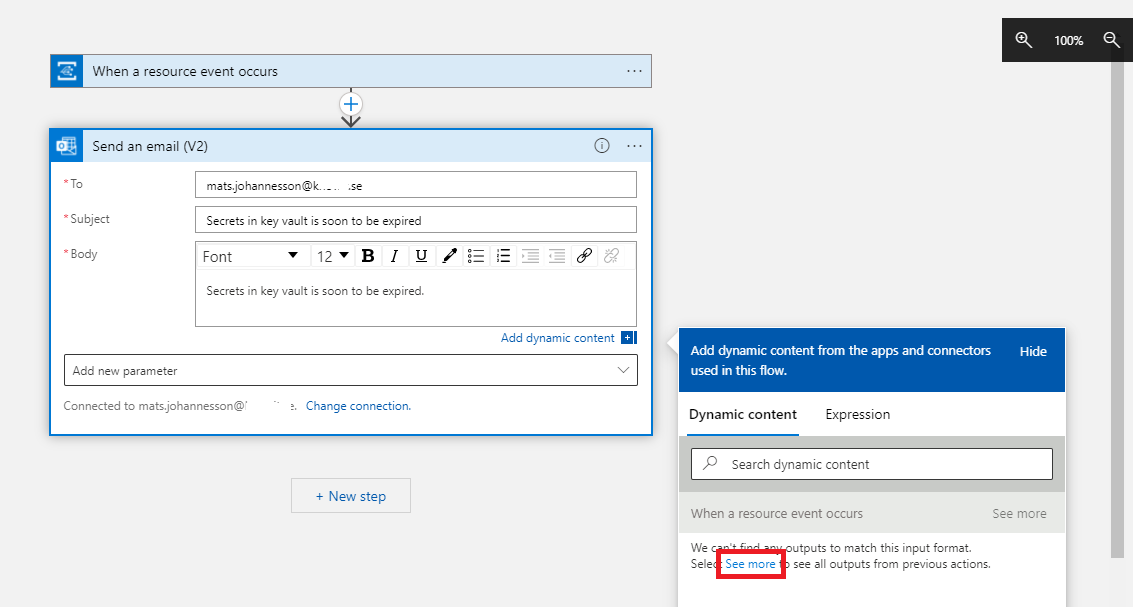
- Subject: Write the text for your subject. Click on Add dynamic content – See more (in box “Add dynamic content from apps and connectors used in this flow.”).
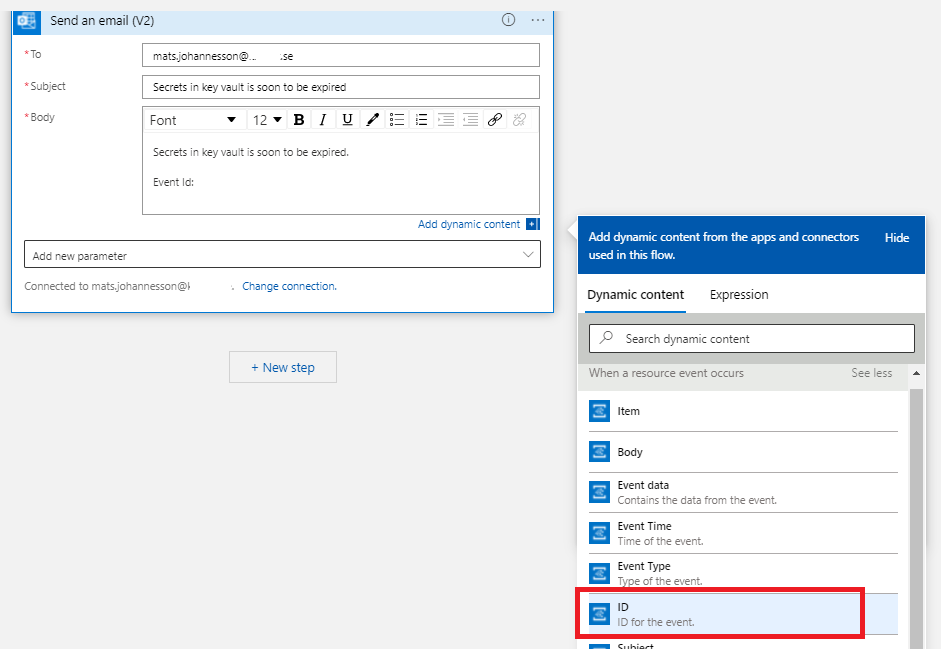
- In Body, put in Event Id:, in box for Dynamic content, click on ID.

Your email template may look like this example:
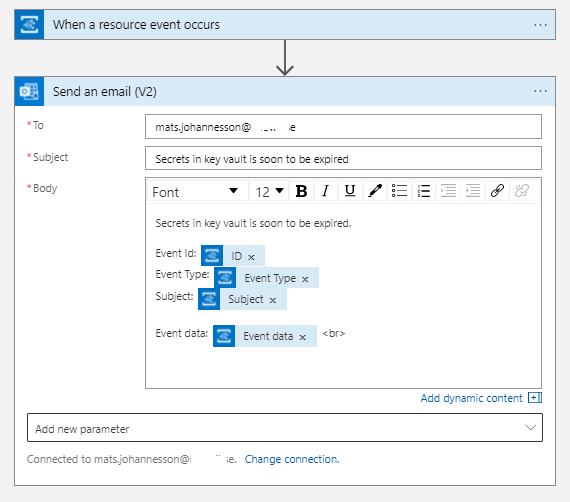
11. Click Save as.
12. Enter a name for new logic app and click Create.
Task 3: Test and verify
1. Go to your key vault on the Azure portal.
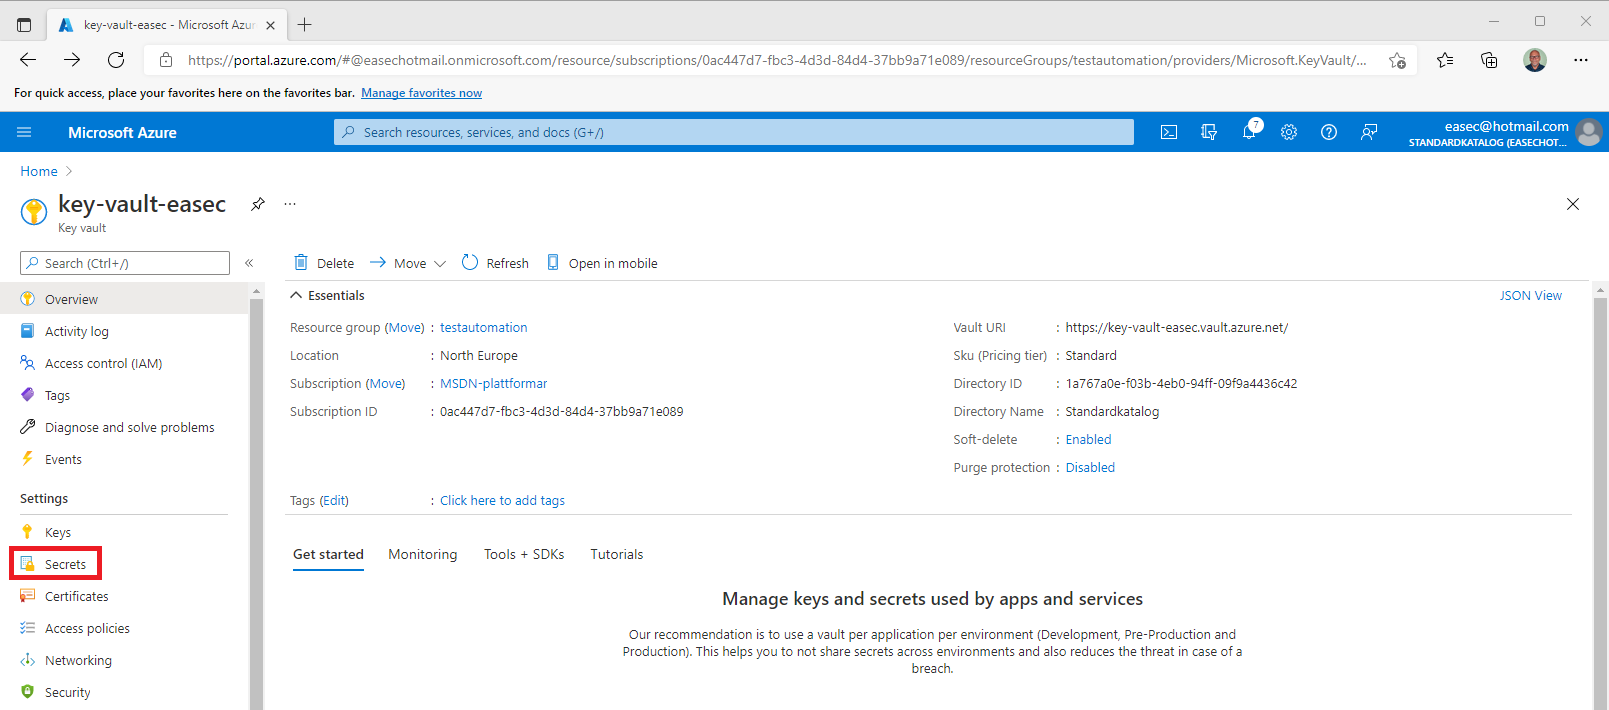
2. Click on Secrets.
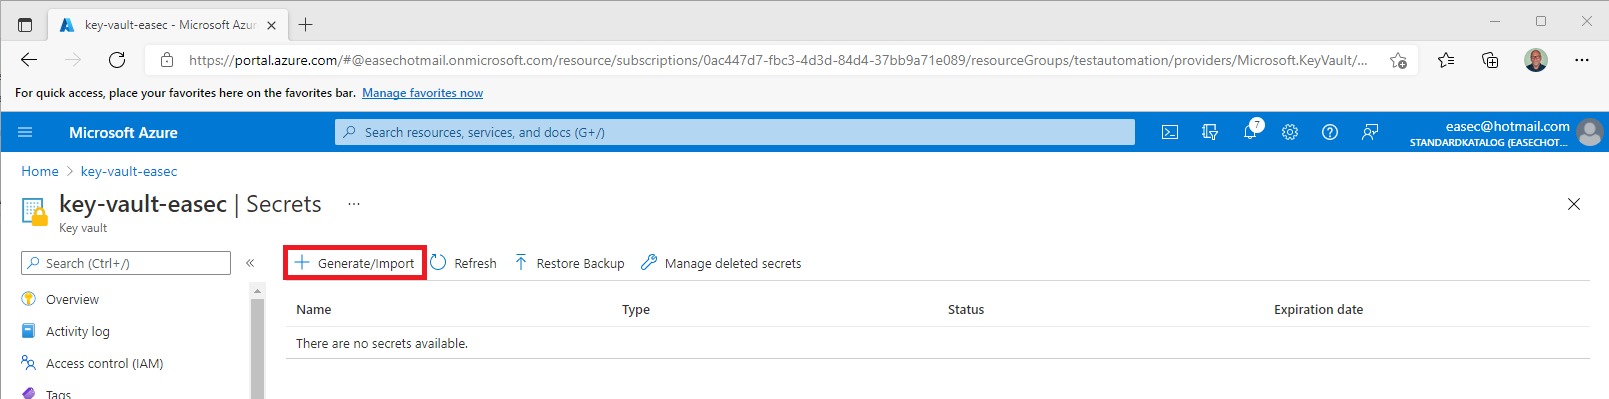
3. Create a new secret – click on Generate/Import.
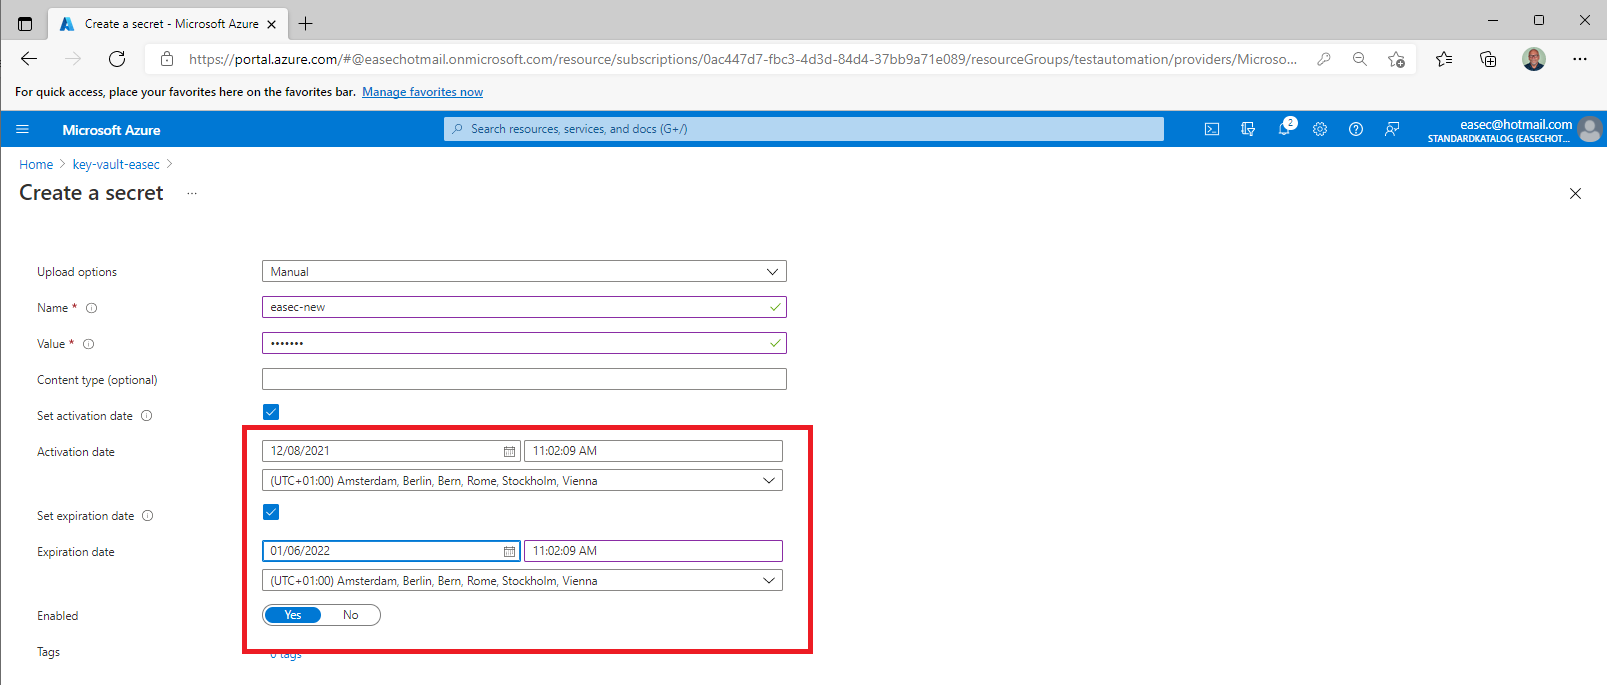
4. For testing and verify purpose, set the Activation date, and the Expiration date to 29 days ahead. Click on Create.
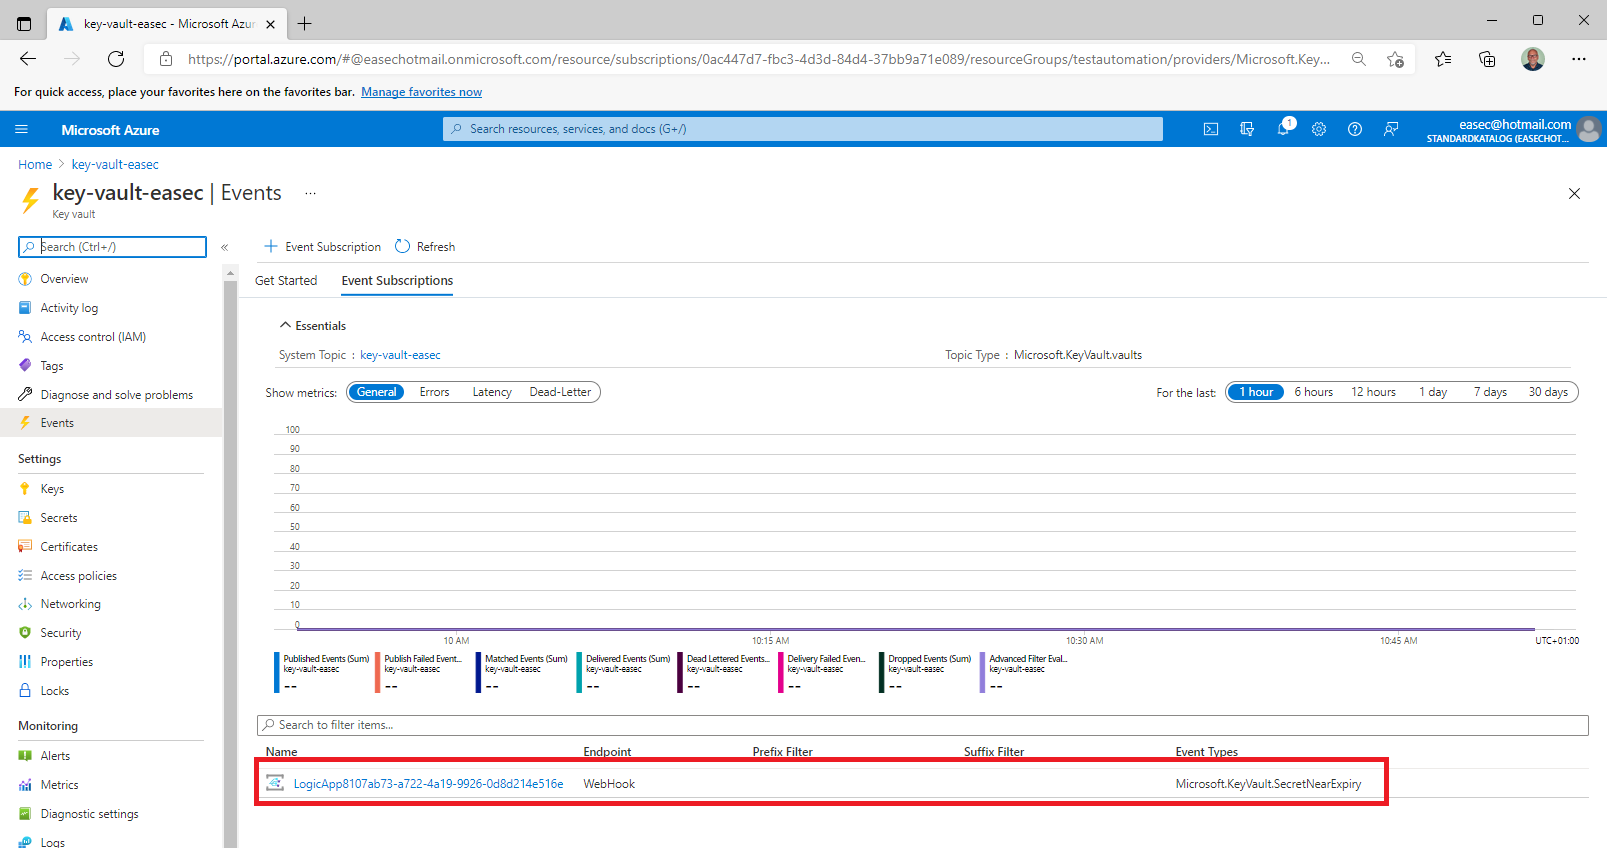
5. On the Events tab in your key vault, select the Logic Apps that you just created.
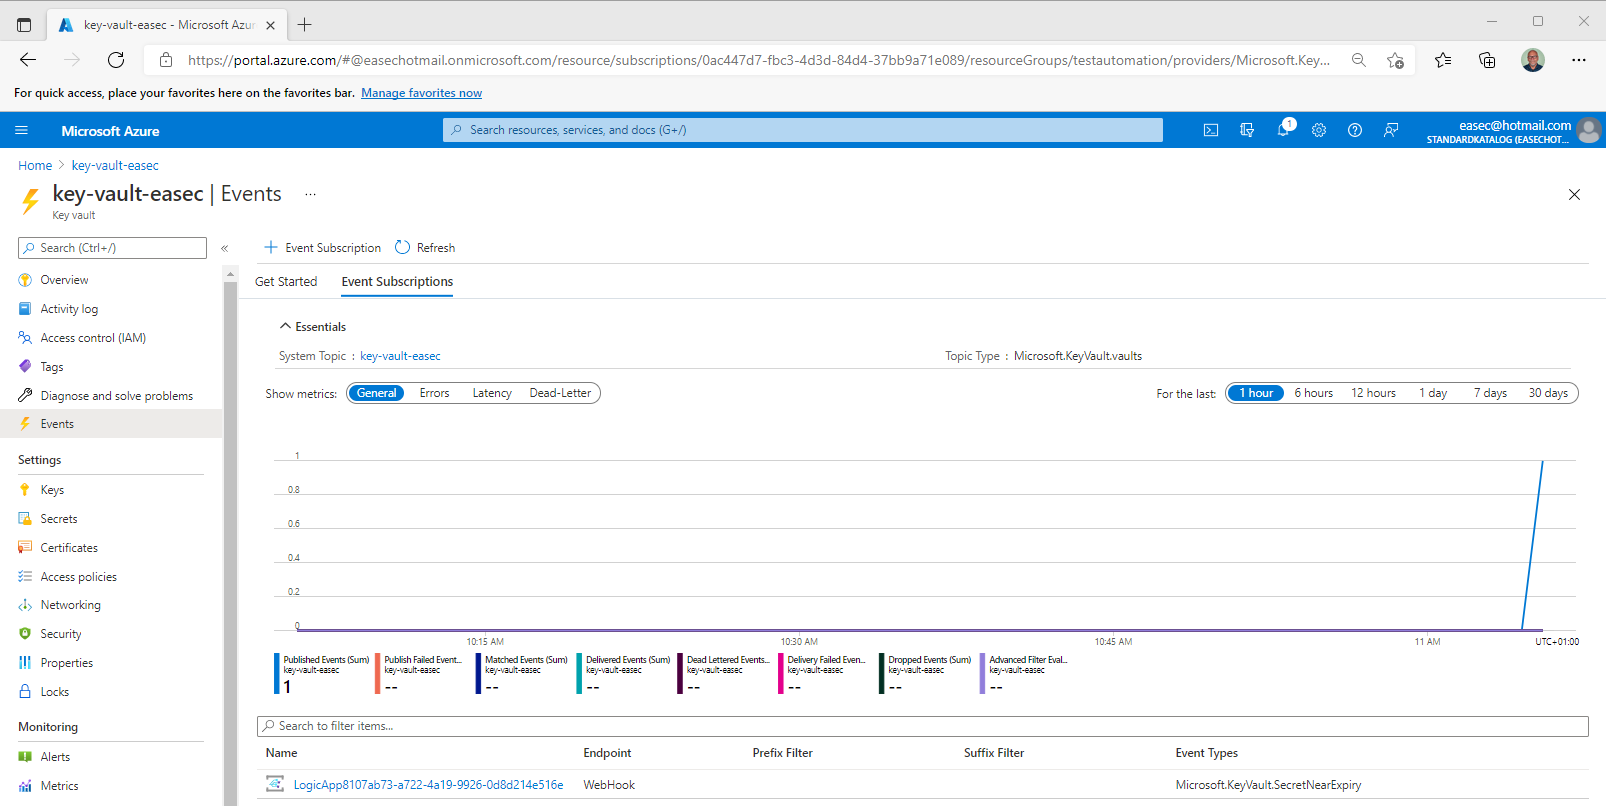
6. Wait a couple of minutes (depending on your configuration), event will be fired, and email should be sent to configured mailbox.
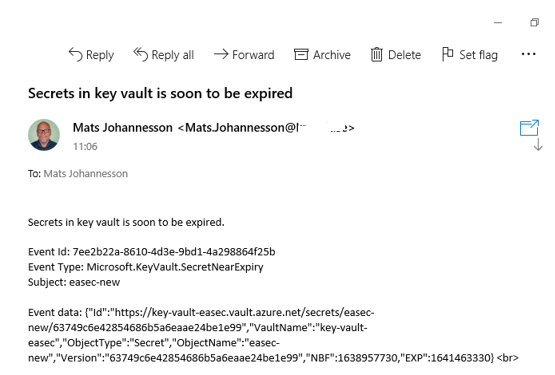
7. Check your mailbox, there will be an email on these issue. The test is completed.

The goal for this information and my book, is to get you up and running Kubernetes. The recommended way, is to read the information in this order:
1. Overview (this blog entry): to get overview about control plane.
2. Pod(Pods): to get information about pod (to be posted).
3. kubectl: the CLI tool to handle the cluster (to be posted).
4. Service: to get information about service and how to work with these (to be posted).
5. Namespaces: to get information about namespaces and how to work with namespaces to isolate resources on the cluster (to be posted).
6. Helm: to get information about Helm (to be posted).
7. Managed Services (Cloud): to get information about managed services for Kubernetes in the Cloud (Azure, GCP and aws) (to be posted).
Overview
Kubernetes is a portable, extensible, open-source platform for managing containerized workloads and services, that facilitates both declarative configuration and automation. It has a large, rapidly growing ecosystem. Kubernetes services, support, and tools are widely available.
The name Kubernetes originates from Greek, meaning helmsman or pilot. K8s as an abbreviation result from counting the eight letters between the "K" and the "s". Google open-sourced the Kubernetes project in 2014. Kubernetes combines over 15 years of Google's experience running production workloads at scale with best-of-breed ideas and practices from the community.
Components
When you deploy Kubernetes, you get a cluster.
A Kubernetes cluster consists of a set of worker machines, called nodes, that run containerized applications. Every cluster has at least one worker node.
The worker node(s) host the Pods that are the components of the application workload. The control plane manages the worker nodes and the Pods in the cluster. In production environments, the control plane usually runs across multiple computers and a cluster usually runs multiple nodes, providing fault-tolerance and high availability.
The control plane's components make global decisions about the cluster (for example, scheduling), as well as detecting and responding to cluster events (for example, starting up a new pod when a deployment's replicas field is unsatisfied). Kubernetes use Desired State Configuration, it compares desired configuration against the running configuration, and make changes when the desired configuration is not satisfied.
Control plane components can be run on any machine in the cluster. However, for simplicity, set up scripts typically start all control plane components on the same machine, and do not run user containers on these machines. Components for control plane are: API server, etcd, scheduler, and controller-manager.
API server
The API server is a component of the Kubernetes control plane that exposes the Kubernetes API. The API server is the front end for the Kubernetes control plane.
The main implementation of a Kubernetes API server is API server. API server is designed to scale horizontally—that is, it scales by deploying more instances. You can run several instances of API server and balance traffic between those instances.
etcd
Consistent and highly available key value store used as Kubernetes' backing store for all cluster data. etcd is used as a Single Source of Truth (SSOT). In production it´s vital to provide fault-tolerance and high availability for etcd. At least, use three (3) machines for etcd.
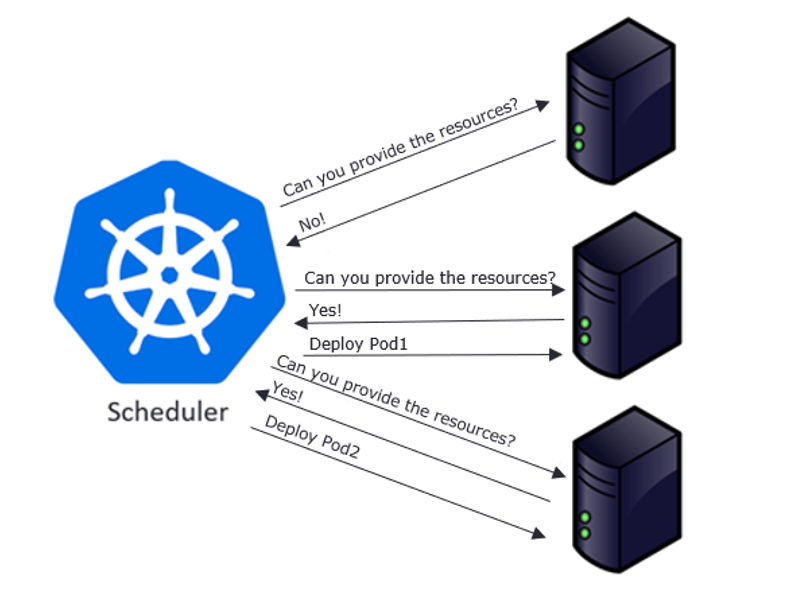
Scheduler
Control plane component that watches for newly created Pods with no assigned node and selects a node for them to run on. It attempts to reach the desired state as per etcd values from current state.
Factors considered for scheduling decisions include individual and collective resource requirements, hardware/software/policy constraints, affinity and anti-affinity specifications, data locality, inter-workload interference, and deadlines.
Scheduling starts with finding suitable nodes that have resources that can host a pod. For example, if a pod has specific sets of requirements in terms of CPU and Memory passed in the request, then only those nodes will be selected that have these requirements. This is handled by a set of predicates which execute in chain filtering nodes for each given parameter, like ports, hostname, resources, node pressure in terms of processes and CPU usage.
As nodes get evaluated against the parameters, each node gets a ranking showing their suitability, with the highest-ranking node finally getting selected. Once node is selected a binding object is created which has namespace, pod name and uid with reference to the node selected. This binding object then ends up getting sent to API Server via a POST. Once the API Server receives this request it updates the etcd entry for the pod object with the given node name and changes the PodScheduled to true. Once this update is done, it’s time to get the pod running on a worker node.
At this point the object exists in etcd with no actual physical resources assigned. Next the object will be sent over to the set of nodes referenced to the object in etcd. This is done by a pull mechanism executed by kublet.
Limits and request
A pod in Kubernetes can freely consume resources, such as CPU and memory, from the underlying system. But that doesn't mean it should.
IT teams define limits that restrict pods from using all the resources of the system. That way, there isn't any unfair distribution of resources across applications running on the pods.
To understand these configurable constraints, first let's examine requests and limits in Kubernetes. Both are applied at the pod level. The Kubernetes scheduler uses this information to determine where to place a pod.
- A request is the minimum resources a container needs on a node to function properly. If there aren't nodes with sufficient resources to meet these requests, the pod won't be created.
- A limit sets the maximum amount of a resource that a container can use. If a container consumes more than its limit, then it's either throttled down (in the case of CPU) or the container is terminated (in the case of memory). Limits ensure containers don't consume more resource than they're assigned, which leads to resource exhaustion
Choosing practical requests and limits
Setting requests and limits correctly is critical to the Kubernetes cluster. But setting pragmatic Kubernetes requests and limits is not a straightforward task. It can also be unpredictable.
Use trial and error to determine the appropriate limitations. There can't be a one-size-fits-all or optimal value for all containers. Resource consumption depends on the application and varies on a case-by-case basis.
Ideally, maintain a 20% to 30% margin during request setup so that, even if slightly more resources are required than allocated, it can be managed easily. But don't overcommit resources, as it can result in performance bottlenecks on the node.
Setting requests and limits
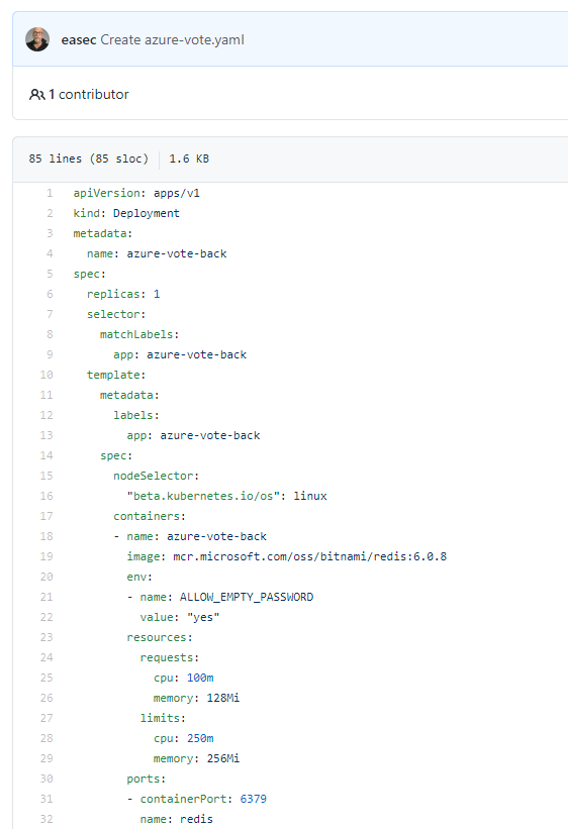
Setting up Kubernetes requests and limits on pods is as simple as applying the pod configuration file below, with requests and limits set for CPUs in "millicpu" and for memory in "MiB."
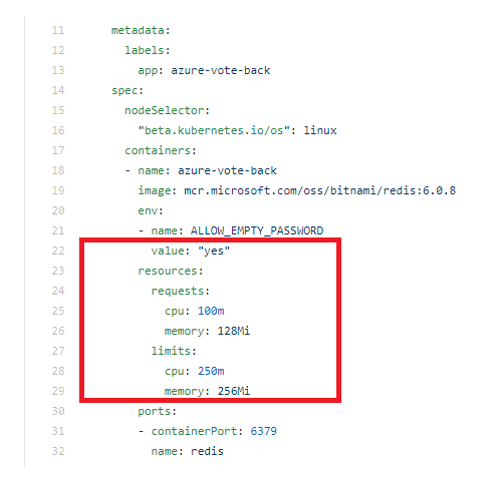
To apply these settings, use following command:
kubectl apply -f <name_for_yaml file> --namespace=<name_for_namespace>
For more information about namespace, see the section Namespaces.
Deault requests and limits
Developers should set their own resource requests and limits. But sometimes they either over-provision resources for containers out of an abundance of caution or forget to set requests and limits altogether. Therefore, Kubernetes cluster administrators should enforce requests and limits on a Kubernetes namespace level. This ensures that, as soon as a container is created in the namespace, resource bounds are applied to them automatically.
There are two ways to control resource consumption on a Kubernetes namespace: Resource Quotas and Limit Ranges. For more information about namespace, see the post for Namespaces.
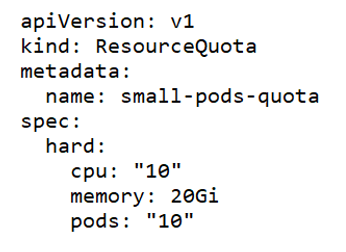
Resource Quotas
A ResourceQuota limits the total resource consumption of a namespace. For example, in the following YAML configuration, the namespace has a hard limit of 10 CPUs, 20 Gi of memory and 10 pods.
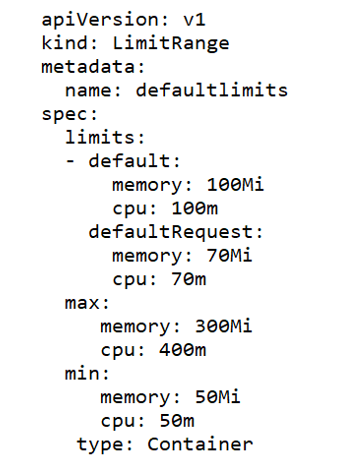
Limit Ranges
LimitRange objects manage constraints at a pod/container level, and the configurations are applied on individual containers, rather than across all resources in a namespace. If a container doesn't specify its own container limit, then a "LimitRange" object will apply default requests and limits, which are restricted by the ResourceQuota at the namespace level.
LimitRange objects are defined as shown in the following example YAML configuration, where "max" and "min" sections cover the maximum and minimum limits of resources. The "default" section configures containers with these default limits, if not explicitly specified otherwise. Finally, the "defaultRequest" section controls the assignment of default request values for the container, if not defined already.
Controller-manager
Controller-manager is a Control Plane component that runs controller processes.
Logically, each controller is a separate process, but to reduce complexity, they are all compiled into a single binary and run in a single process.
Some types of these controllers are:
- Node controller: Responsible for noticing and responding when nodes go down.
- Job controller: Watches for Job objects that represent one-off tasks, then creates Pods to run those tasks to completion.
- Endpoint’s controller: Populates the Endpoints object (that is, joins Services & Pods).
- Service Account & Token controllers: Create default accounts and API access tokens for new namespaces.
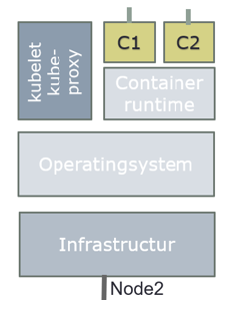
Node Components
Node components run on every node, maintaining running pods and providing the Kubernetes runtime environment.
kubelet
An agent that runs on each node in the cluster. It makes sure that containers are running in a Pod.
The kubelet takes a set of PodSpecs that are provided through various mechanisms and ensures that the containers described in those PodSpecs are running and healthy. The kubelet doesn't manage containers which were not created by Kubernetes.
Example:
kublet polls API Server for pods bound to the node it is running on by default every 20 seconds. If it detects a change compared to its own state, it begins to synchronize to the new state.
It works through following steps:
1. If it’s a new pod, register it and publish startup metrics.
2. Generate a pod status object with possible values like Pending, Running, Succeeded, Failed and Unknown, as these represent the states a pod can be in. It is determined by running pod specs to through a chain of PodSyncHandlers. Each handler checks if pod should run on the node or not. If any one of these fails, the pod will transition to evicted state.
3. Upon generation of Pod status, it will be sent to etcd for updating. Pod is then running through a set of node level admission handlers like AppArmor profiles and privilege evaluations.
4. If pod has specific cgroup requirements, these will be enforced and attached to the pod.
5. Data directories are then created for pod data, volumes, and related plugins.
6. Any volumes required will be created and attached.
7. Secrets, if needed, are pulled from API server, and made available for injection into the pod.
8. Image-related info such as secrets and url is gathered and made available for the container runtime to execute.
9. Finally, all this info is passed to container runtime to actually run the container.
The time has now come to make our container live by making it run on the physical resources. This is achieved by invoking CRI (Container Runtime Interface), which is an interface layer between Kubernetes and container runtimes, such as docker, containerd, rkt and more.
kube-proxy
kube-proxy is a network proxy that runs on each node in your cluster, implementing part of the Kubernetes Service concept. kube-proxy maintains network rules on nodes. These network rules allow network communication to your Pods from network sessions inside or outside of your cluster. kube-proxy uses the operating system packet filtering layer if there is one and it's available. Otherwise, kube-proxy forwards the traffic itself.
Container runtime
The container runtime is the software that is responsible for running containers.
Kubernetes supports several container runtimes: Docker, containerd, CRI-O, and any implementation of the Kubernetes CRI (Container Runtime Interface).
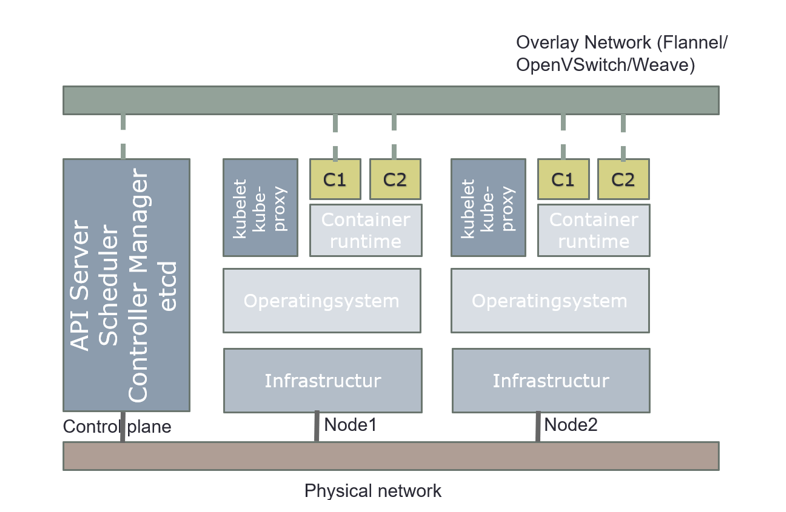
Overview how everything is connected in Kubernetes
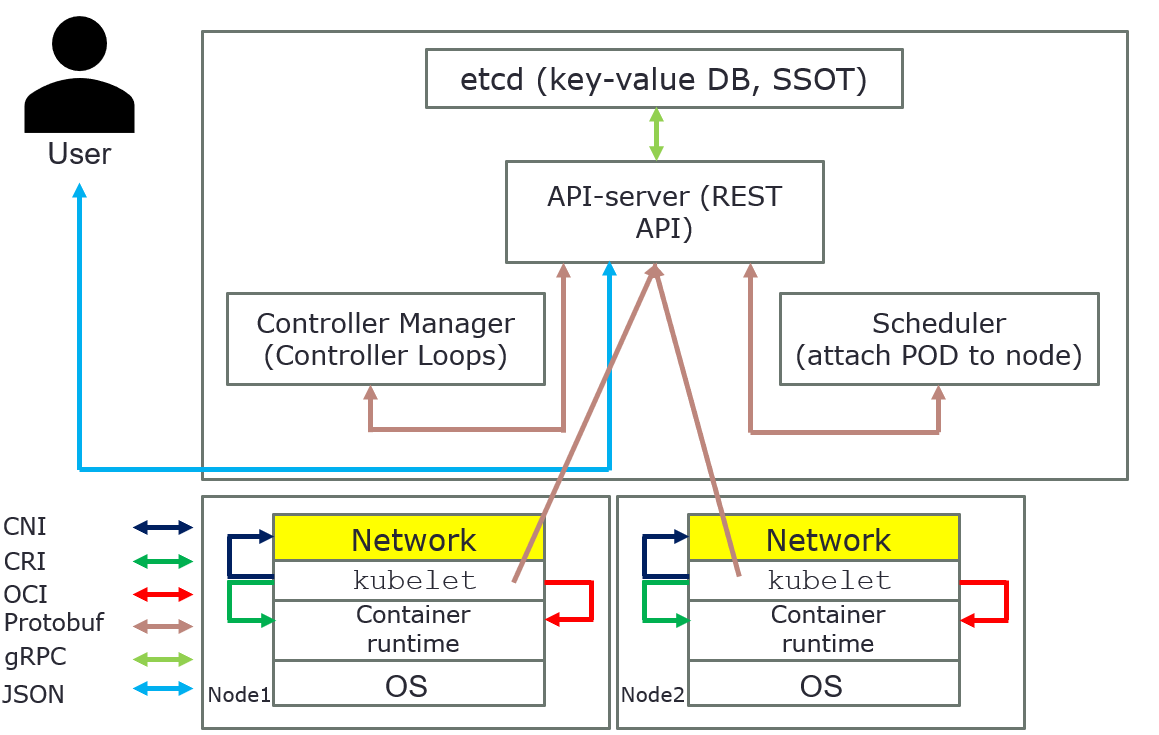
The above pictures are just for an overview, it´s show how everything is connected in Kubernetes.
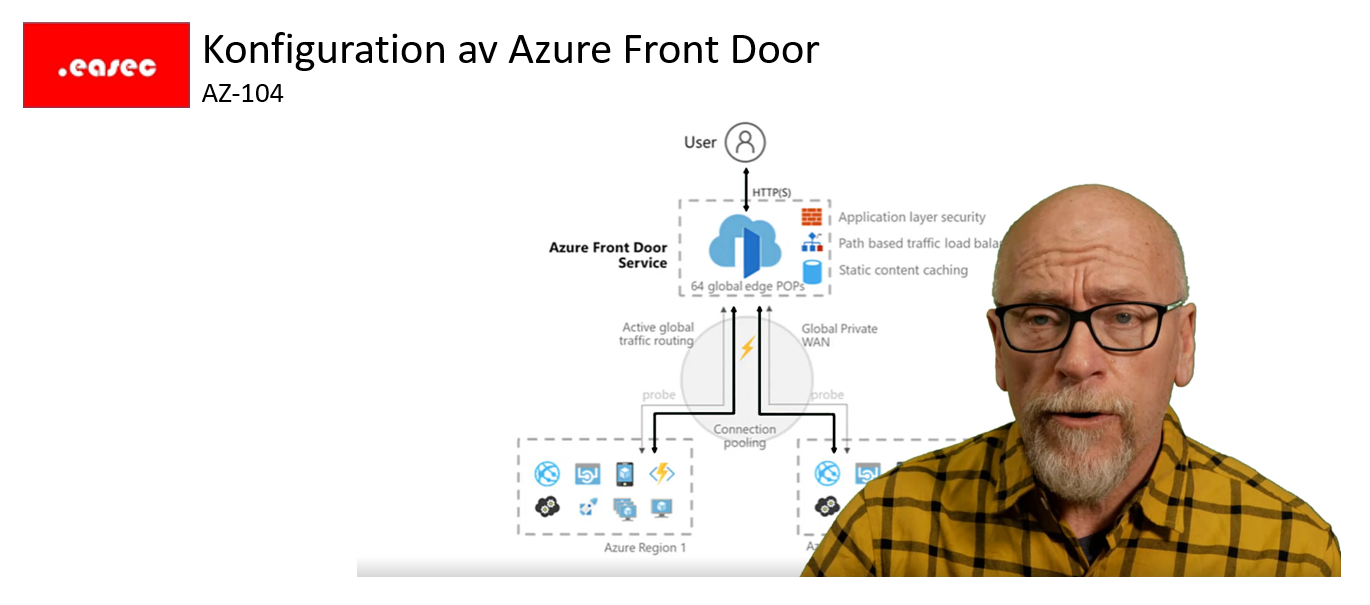
Nu finns .easec både på Facebook Live (https://www.facebook.com/easecutbildning) och YouTube (https://www.youtube.com/channel/UCypJs6Ew0zJUbjcHBlMP0YQ)!
Allra första ut är en serie avsnitt som går igenom tjänster i Azure som kan vara bra att känna till inför certifieringarna AZ-104, AZ-303 och AZ-304!
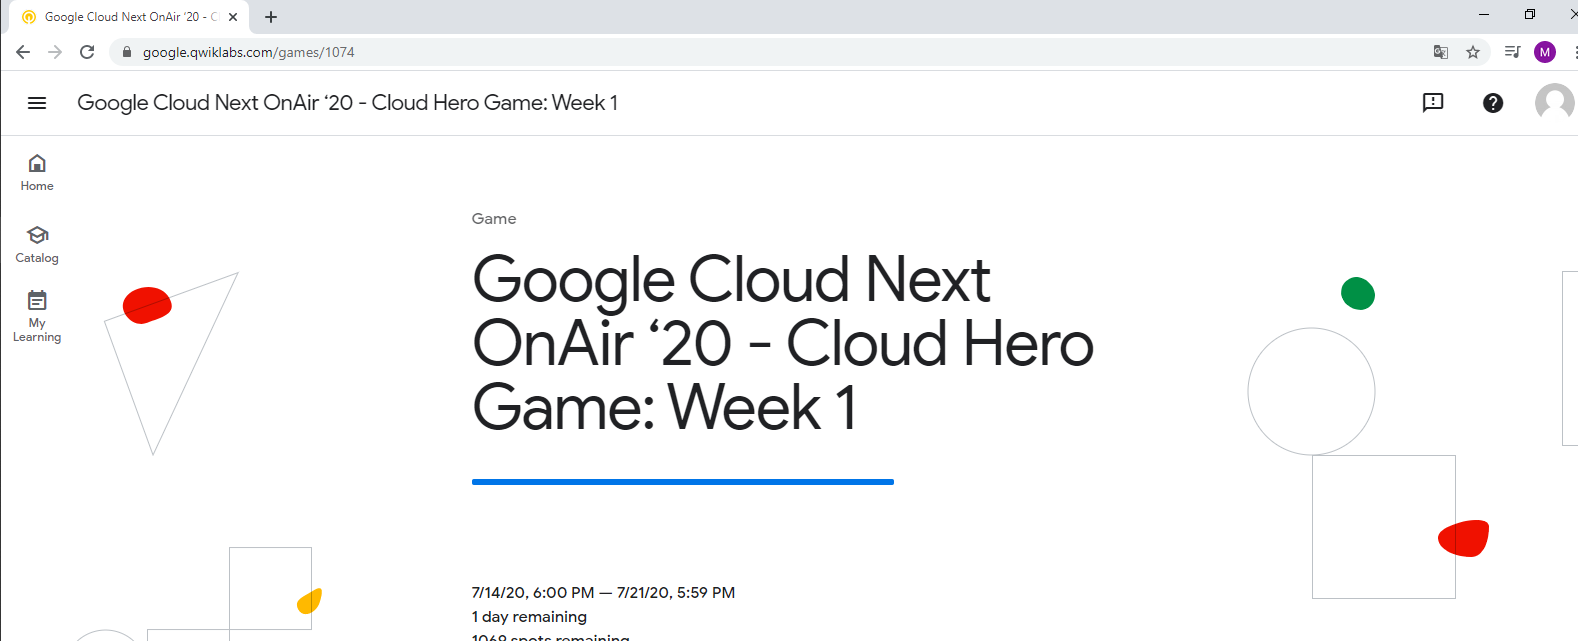
As you maybe have noticed, Google Cloud Next are on air, and so is Cloud Hero Game. First week was about Industry Insights.
The first week assignments was to get through six exercises, from fundamentals-level to expert-level. Each of assigments was timed, and if you completed all the assignments in time, you was honored with a badges:
Assignment 1: Healthcare Lab
In this assignment you created a prediction pipeline using Cloud Healthcare API and AI Platform and trained Tensorfow model. Some Cloud functions was also involved.
Assignment 2: Public Sector Lab
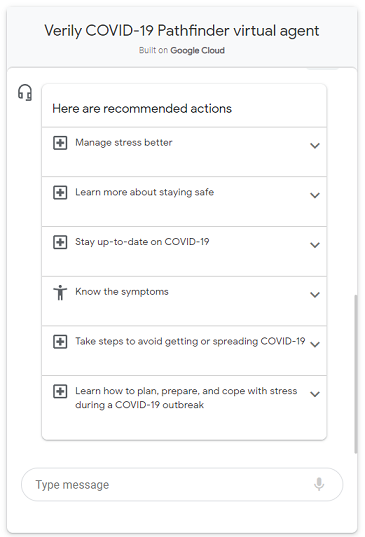
In this assignment you learn to use Dialogflow to create a conversational interfaces to answer questions about COVID-19 symptoms and provide the latest guidance from public health authorities like the Centers for Disease Control and Prevention and World Health Organization (WHO).
Assignment 3: Retail Lab
In this advanced-level assignment you will use a newly available ecommerce dataset to run some typical queries that businesses would want to know about their customers’ purchasing habits.
Assignment 4: Gaming Lab
In this fundamentals-level assignment, you will install Agones on a Kubernetes cluster, then create a simple UDP game server with Agones.
Assignment 5: Finance Lab
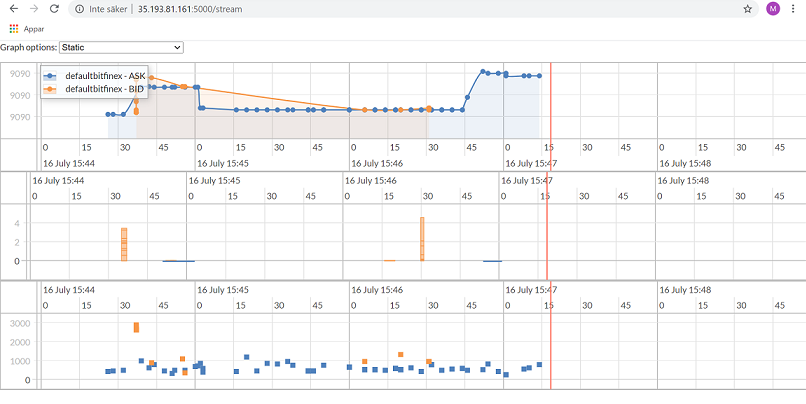
In this expert-level assignment, you will use GCP services to help graph trades, volume, and time delta from trade execution to see any patterns in the high volatility of the cryptocurrency market. It was a good assignment, involving Cloud Dataflow and Cloud BigTable.
Assignment 6: Telecommunication Lab
In this expert-level assignment, you will use Cloud Function, BigQuery, Cloud Pub/Subs, Cloud Dataflow and Cloud Data Loss Prevention (DLP). Some hints where in the documentation, but mostly just instruction what you should do.
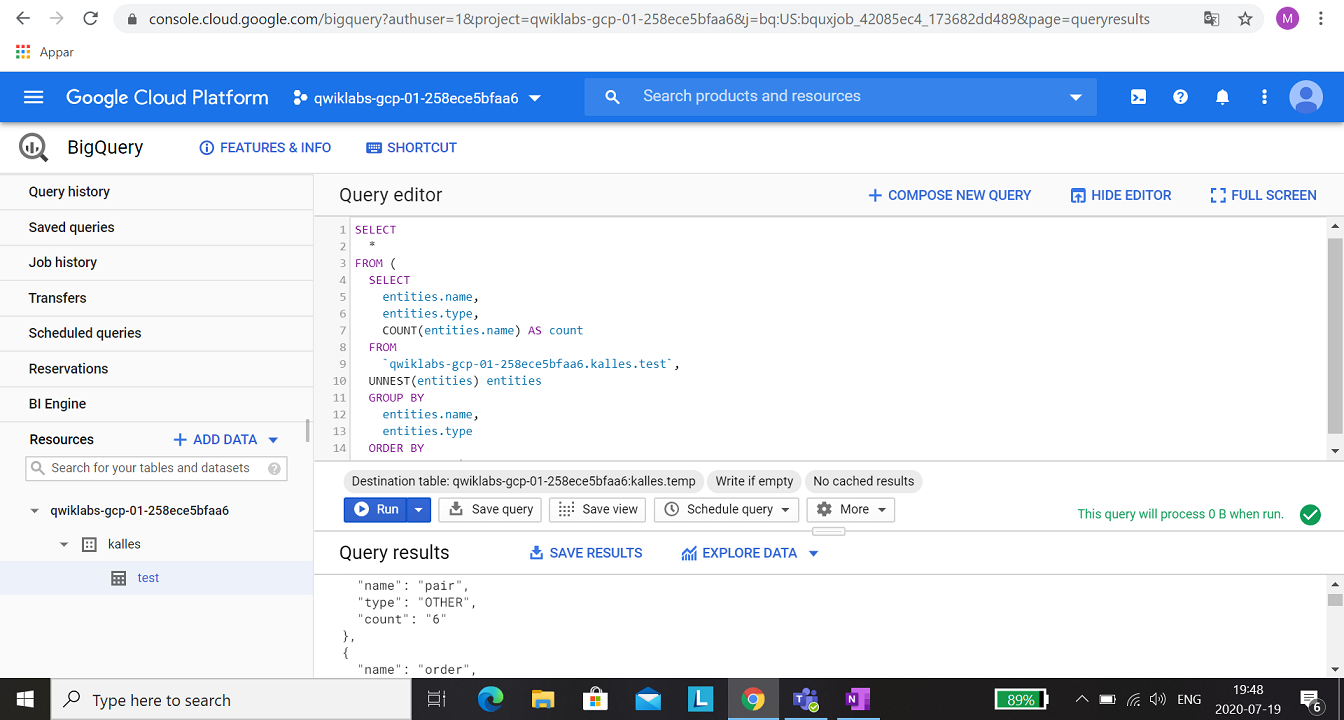
To run a DLP job, a new table with the results have to be created.
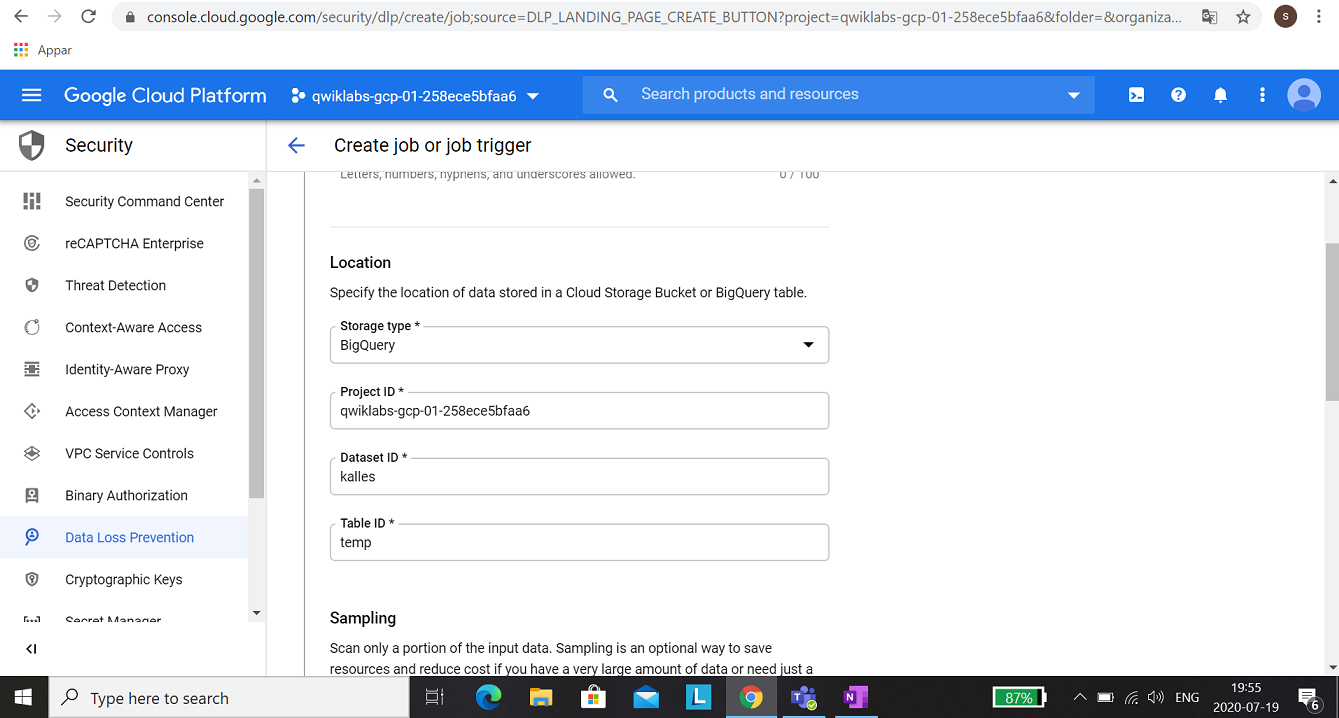
When you have a table, you could configure the DLP job.
Some information about Python was also missing, you have to do:
python -m virtualenv env -p python3
source env/bin/activate
pip install apache-beam[gcp]
pip install dateparser (this one is critical!)
Looking forward to this week Game!
Come across this pdf today, a must read document, not just for GCP. Link to the pdf: https://services.google.com/fh/files/misc/cloud_center_of_excellence.pdf

Prerequisite: Account for GCP and login to the console.
Task 1: Create project and connect to it

1. In the consol, click on Activate Cloud Shell.
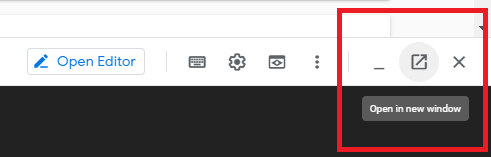
2. When Cloud Shell has opened, click on Open in new window to make it easier for you to work in.

3. In Cloud Shell, write the following command and press Enter, to create a project with the name deployment-manager-easec-xx:
gcloud projects create deployment-manager-easec-xx --name="deployment" --labels=type=deployment
Replace xx with your initials. If the name already exist, put in a extra character to make it unique.
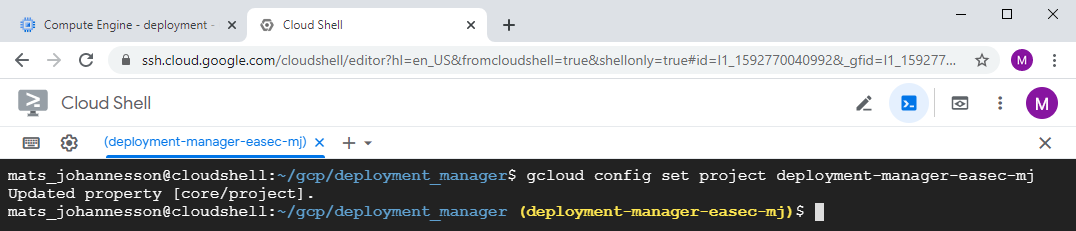
4. In Cloud Shell, write the following command and press Enter to move to the newly created project
gcloud config set project deployment-manager-easec-xx
Task 2: Linking billing account to your project
1. Go back to GCP console, click first on your project and then choose Billing in the Navigation menu.
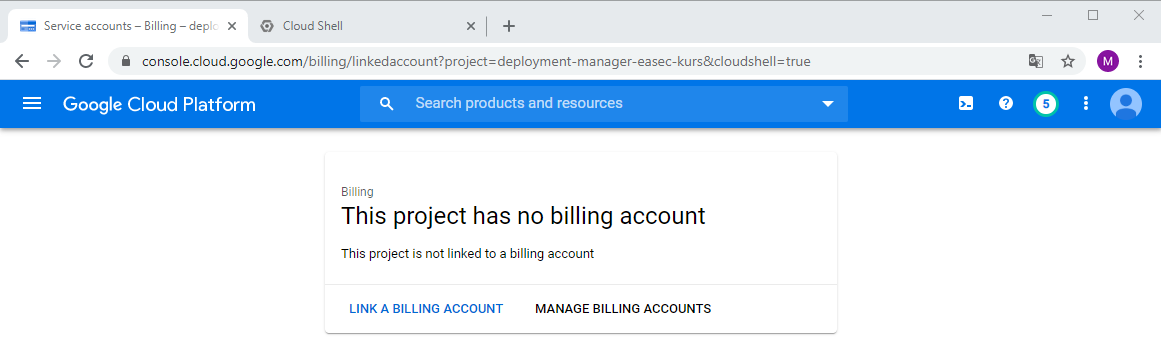
2. Click on LINK A BILLING ACCOUNT.
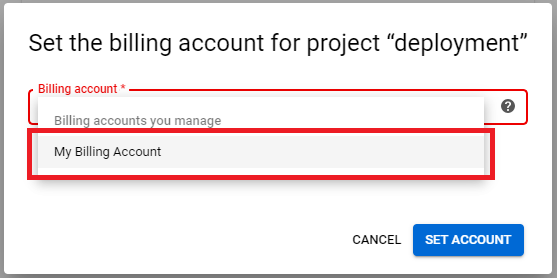
3. Click on dropdownbox and choose My Billing Account, click on SET ACCOUNT.
Task 3: Show and edit .yaml-file for deployment
1. Go back to Cloud Shell, write following command and press Enter to clone .easec:s repository:
git clone https://github.com/easec/gcp/
2. Write following command and press Enter to move to folder gcp/deployment_manger:
cd gcp/deployment_manager/
3. Write following command and press Enter to open simple_template.yaml in nano:
nano simple-template.yaml
Note: there is two resources defined; the-first-vm and the-second-vm.
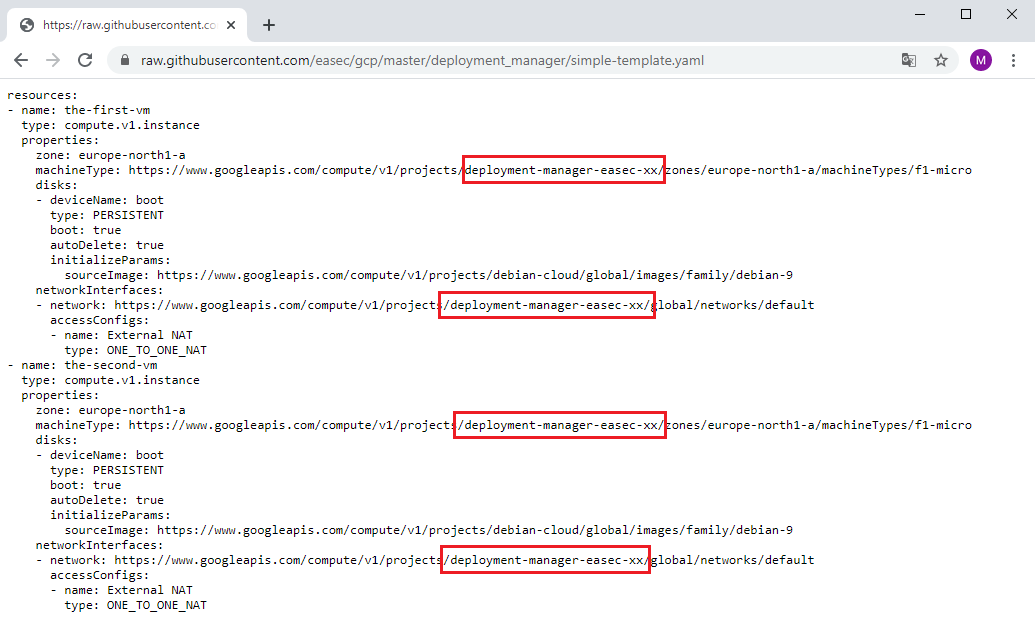
4. Change xx to your initials, it should be the same as the name for your project.
5. Click on ctrl + x to finish nano, write y + Enter to save your changes. Press Enter to confirm the name.
Task 4: Deploy the deployment

1. In the Cloud Shell, write following command and press Enter to activate the API:
gcloud services enable compute.googleapis.com
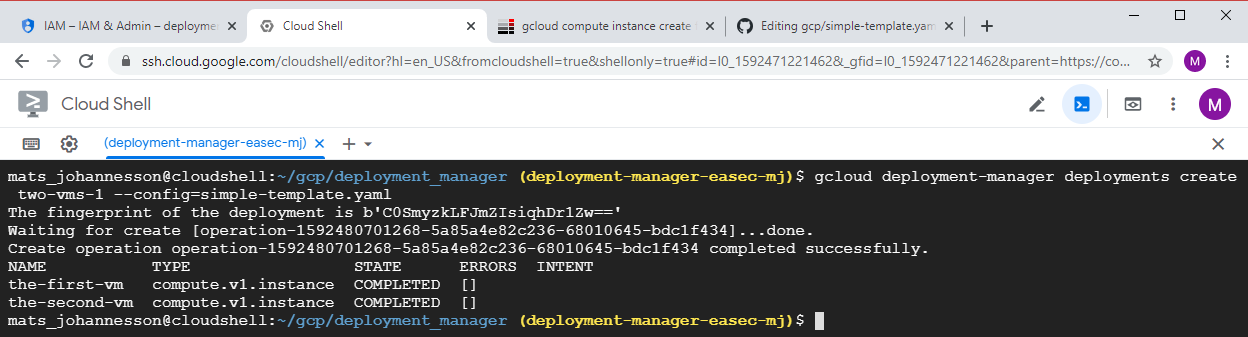
gcloud deployment-manager deployments create two-vms-1 --config=simple-template.yaml
Answer the question "API [deploymentmanager.googleapis.com] not enabled on project y/n" with a y and press Enter.
Task 5: Verify the deployment
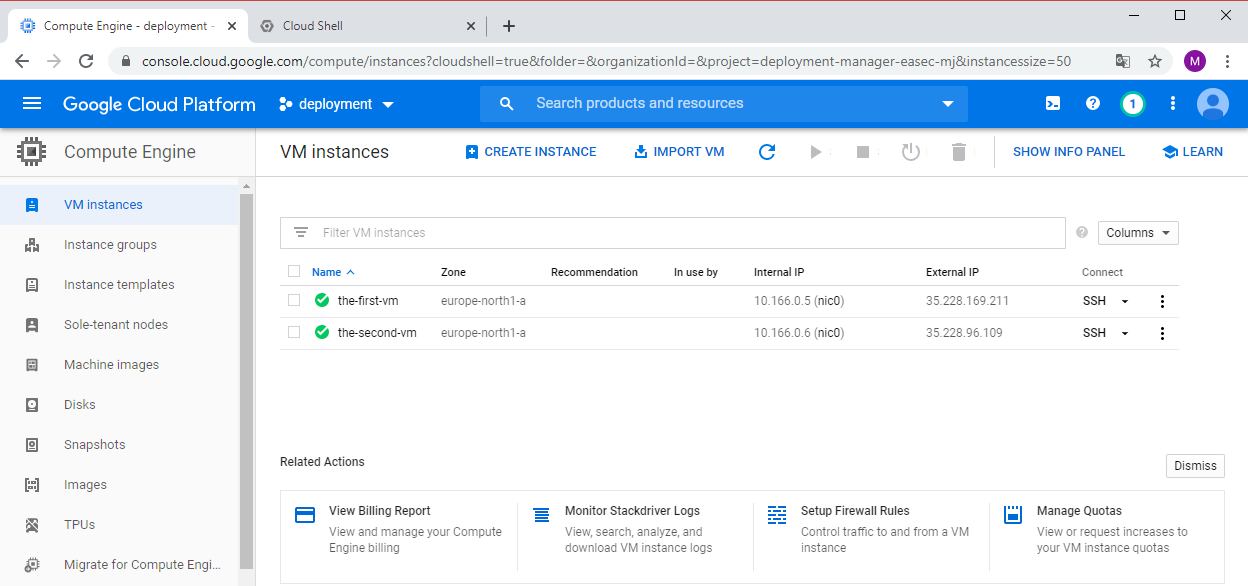
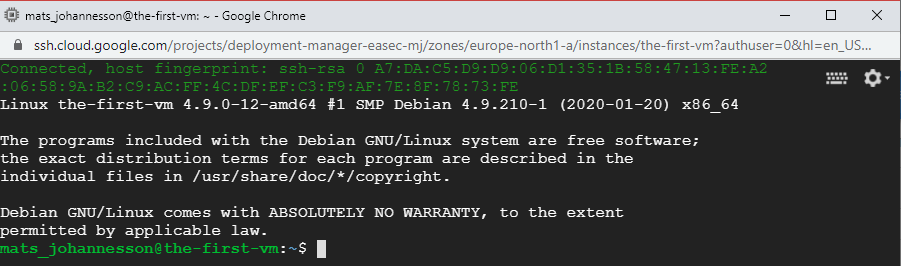
1. Return to GCP Console. In Navigation menu, click on Compute Engine - VM Instances. Verify that there is two virtual machines, the-first-vm and the-second-vm.
2. Click on SSH to connect with SSH to the-first-vm. Verify that you could connect. You could connect becuse the machines use the Default network, this network has Firewall rules that allows SSH.
Task 6: Show manifest for the deployment
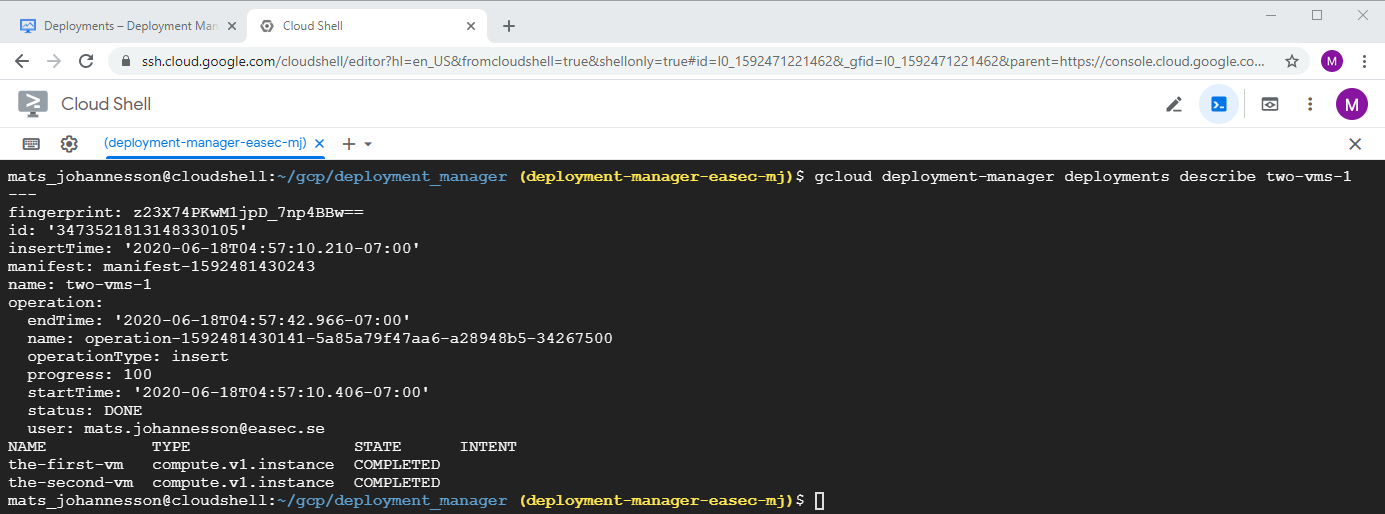
1. Return to Cloud Shell, write following command and click on Enter, to show information about deployment:
gcloud deployment-manager deployments describe
two-vms-1
Task 7: Remove deployment
1. In Cloud Shell, write following command and click on Enter, to show information about deployment:
gcloud deployment-manager deployments
delete two-vms-1
Write y + Enter to confirm that you will remove the deployment.
Task 8: Create deployment with network
1. In Cloud Shell, write following command and click on Enter, to open and edit simple-template-with-network.yaml:
nano simple-template-with-network.yaml
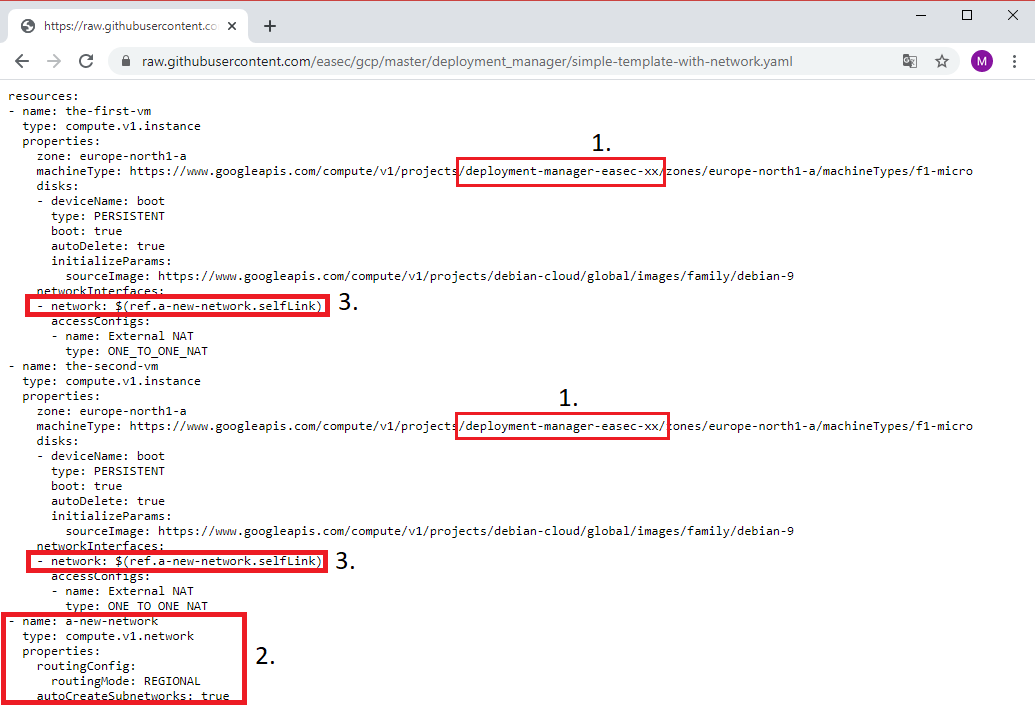
2. Change xx to your initials, it should be the same as the name for your project (1). The network is defined as seperate resource (2) and the I use reference (3) to the defined network for both the-first-vm and the-second-vm. You could read more on references here: https://cloud.google.com/deployment-manager/docs/configuration/use-references (new window).
3. Click on ctrl + x to finish nano, write y + Enter to save your changes. Press Enter to confirm the name.

4. In Cloud Shell, write following command and click on Enter, to create deployment:
gcloud deployment-manager deployments create two-vms-1 --config=simple-template-with-network.yaml
5. Return to GCP Console. In Navigation Pane, click on Compute Engine - VM Instances. Verify that there is two virtual machines, the-first-vm and the-second-vm.
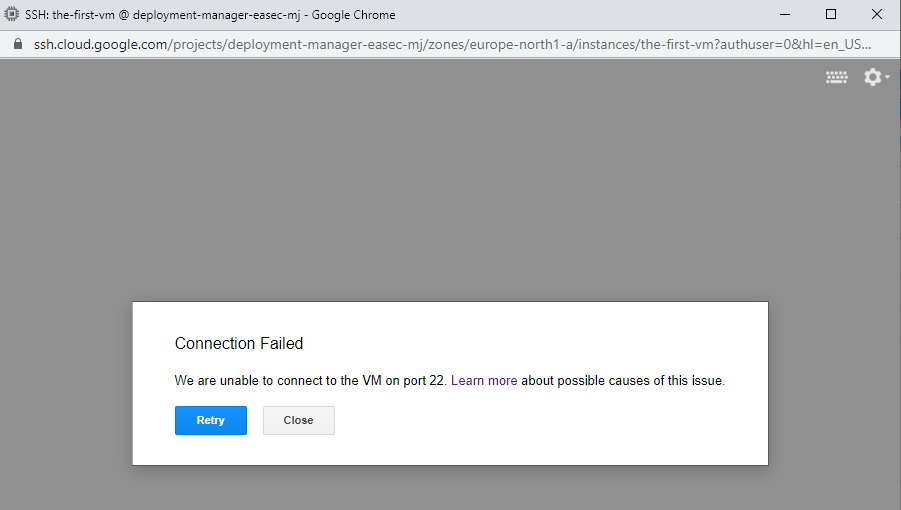
6. Click on SSH to connect with SSH to the-first-vm. Verify that you could not connect, becuse the network you created does´t have Firewall rules that allows SSH.
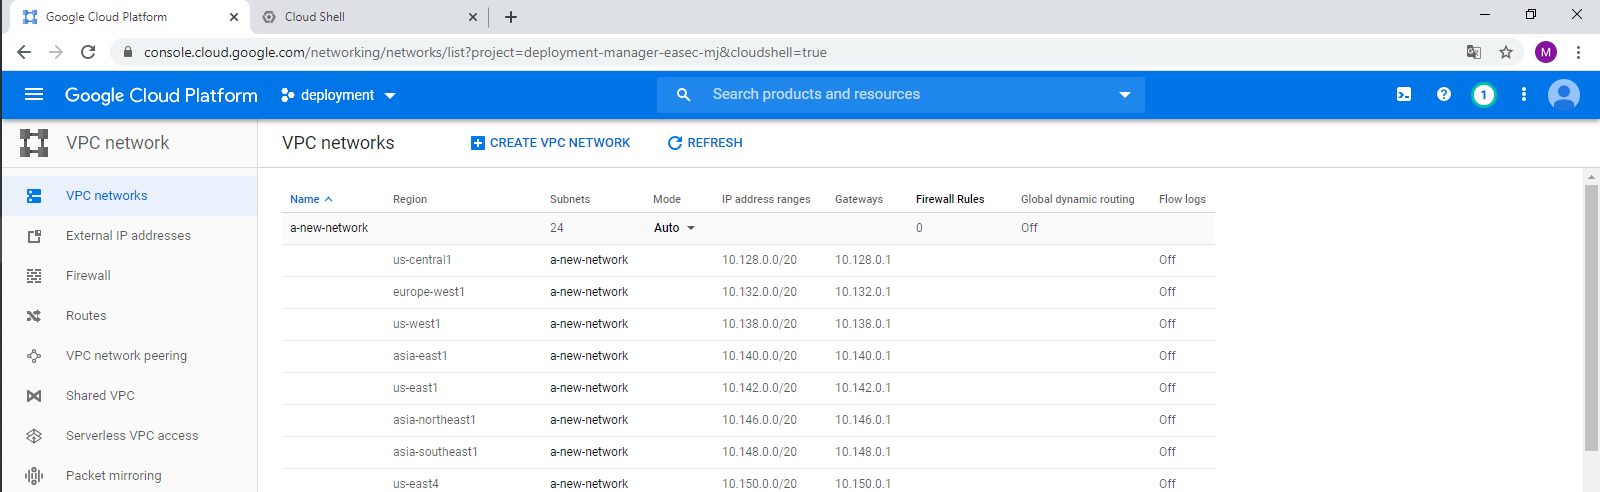
7. In Navigation menu, click on VPC network and verify that network "a-new-network" has been created.
Task 9: Update deployment with firewall rules that allows SSH and ICMP traffic
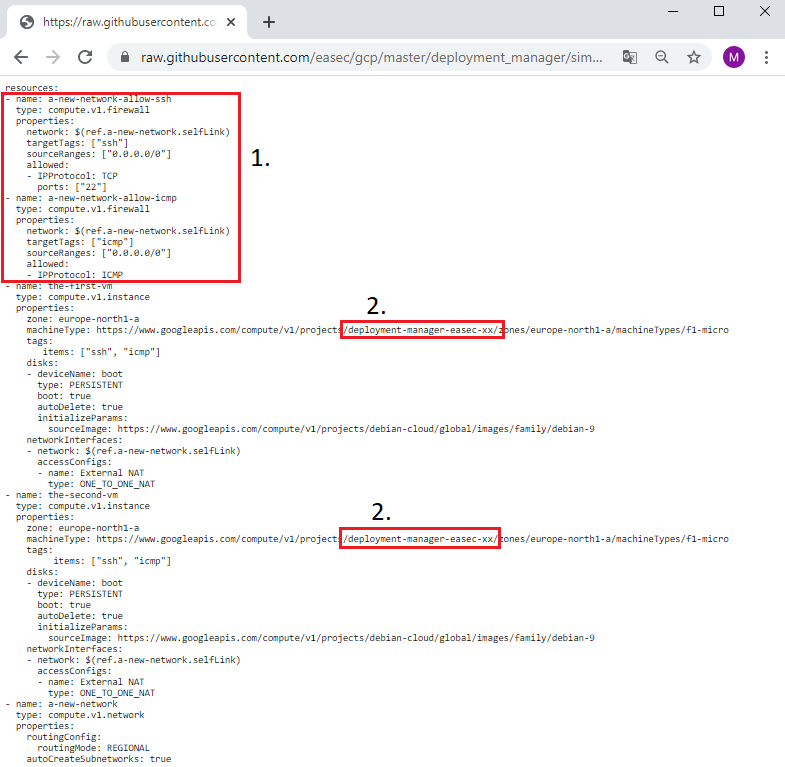
1. Note the reference for the two firewall rules. Change xx to your initials, it should be the same as the name for your project.
2. Click on ctrl + x to finish nano, write y + Enter to save your changes. Press Enter to confirm the name.
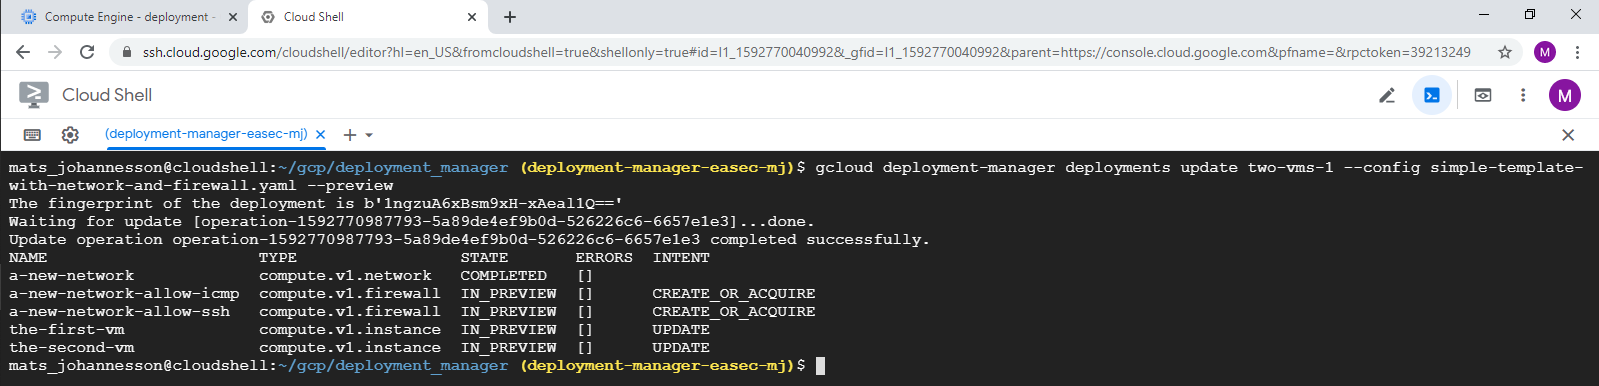
3. In Cloud Shell, write following command and click on Enter, to preview the changes:
gcloud
deployment-manager deployments update two-vms-1 --config
simple-template-with-network-and-firewall.yaml --preview
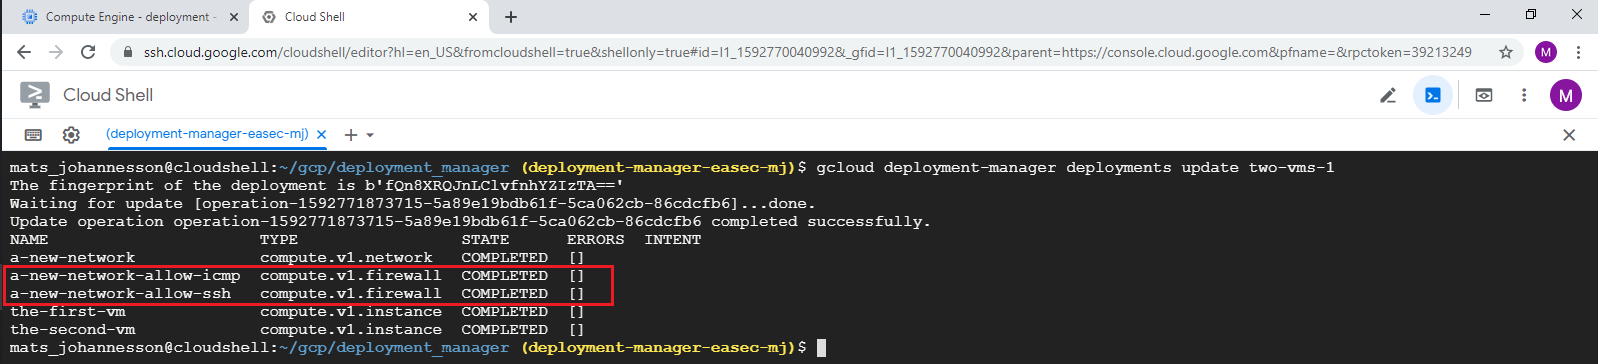
4. In Cloud Shell, write following command and click on Enter, to preview the changes:
gcloud deployment-manager deployments update two-vms-1
Note that you dont´t have to use the configuration file, becuse the system already have knowledgement about this.
5. Return to GCP Console. In Navigation menu, click on Compute Engine - VM Instances.
6. Click on SSH to connect with SSH to the-first-vm. Verify that you could connect,
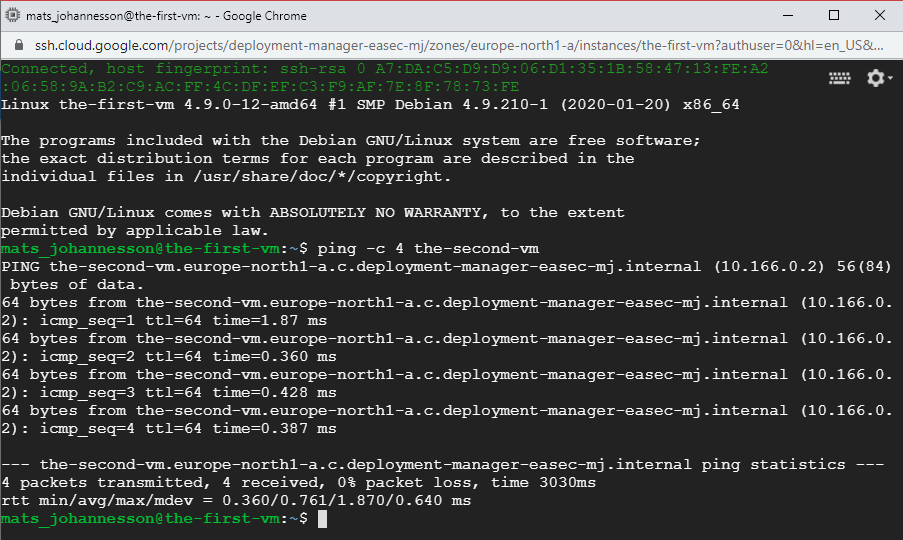
7. In the windows with SSH connection, write following command and click on Enter:
ping -c 4
the-second-vm
Task 10: See the deployment in GCP console
1. Return to GCP Console. In Navigation menu, click on Deployment Manager.

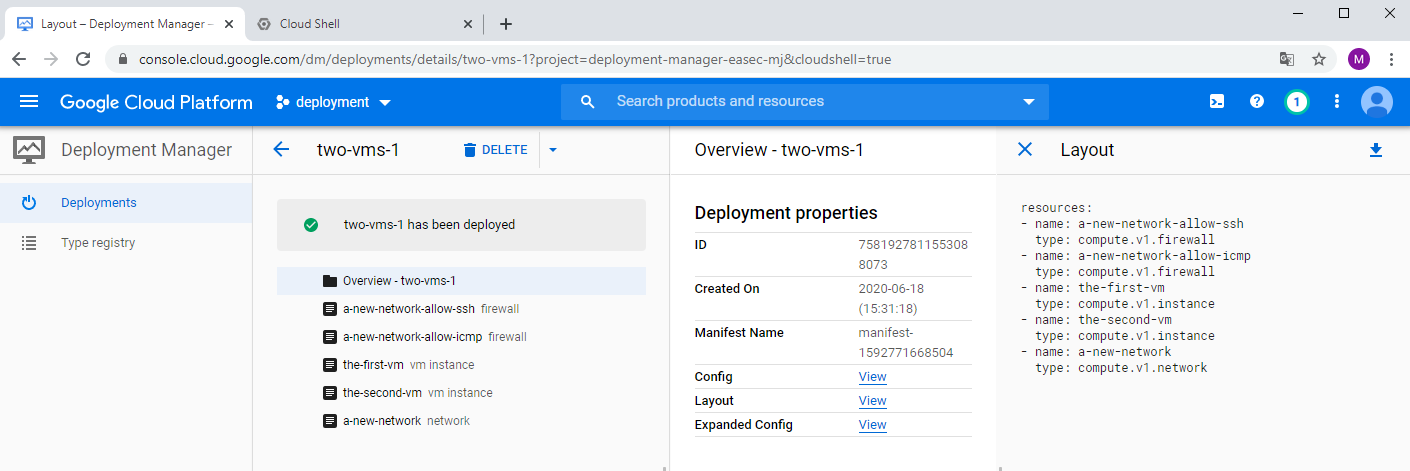
3. Click on your deployment, click on View to the right of Layout, to see the different resources that was implemented in the deployment.
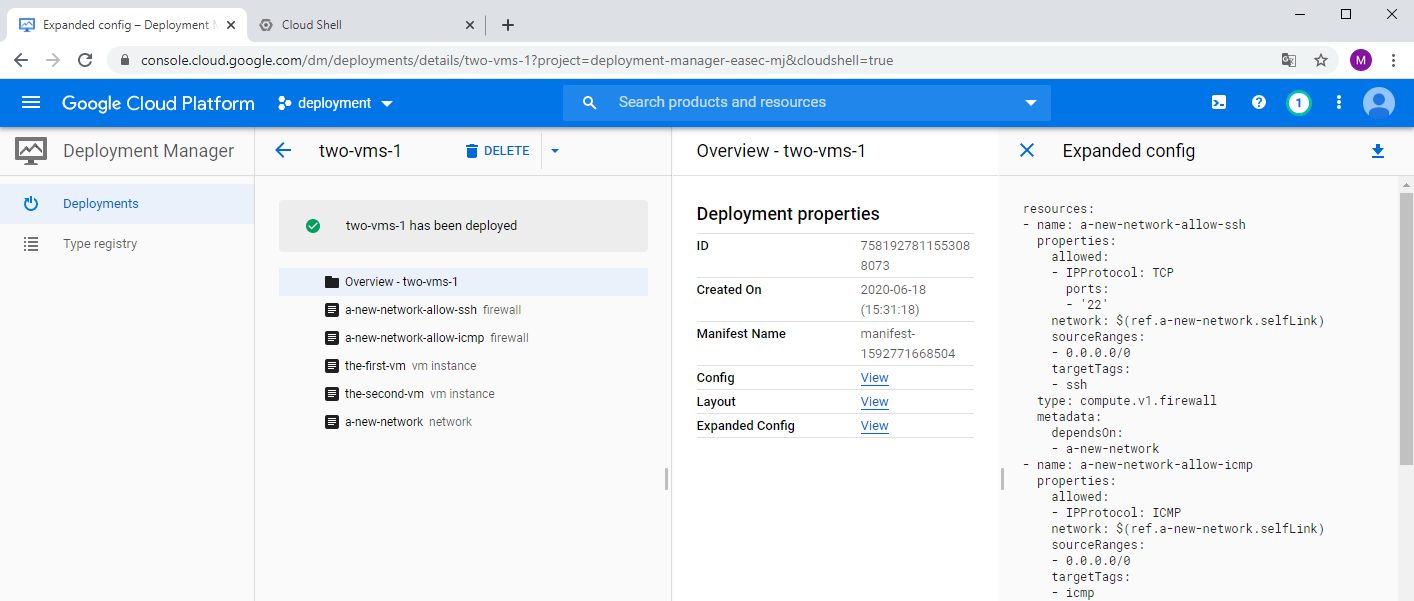
4. click on View to the right of Expand Config, to see more detailed configuration for your deployment.
Task 11: Clean up
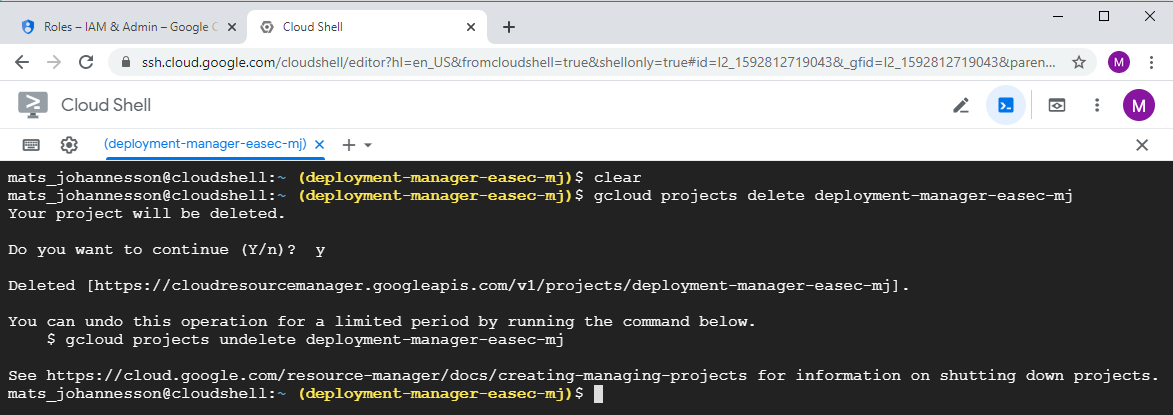
gcloud projects delete deployment-manager-easec-xx
Confirm deletion of project with a y + Enter.
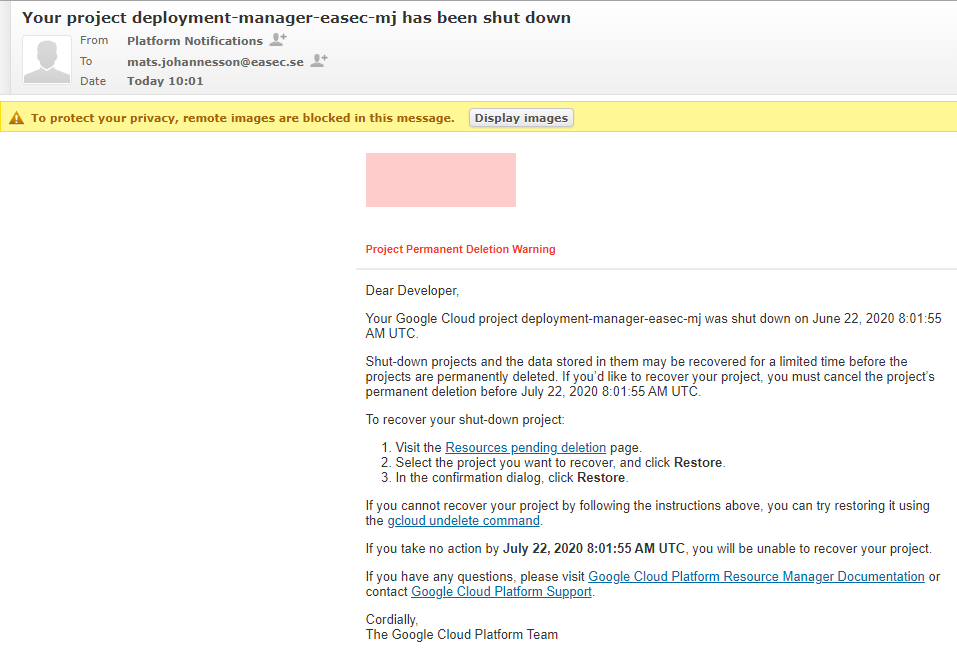
2. You will recive notification about the deletion.
In the next post, will we use Python to work with several templates for our deployments.
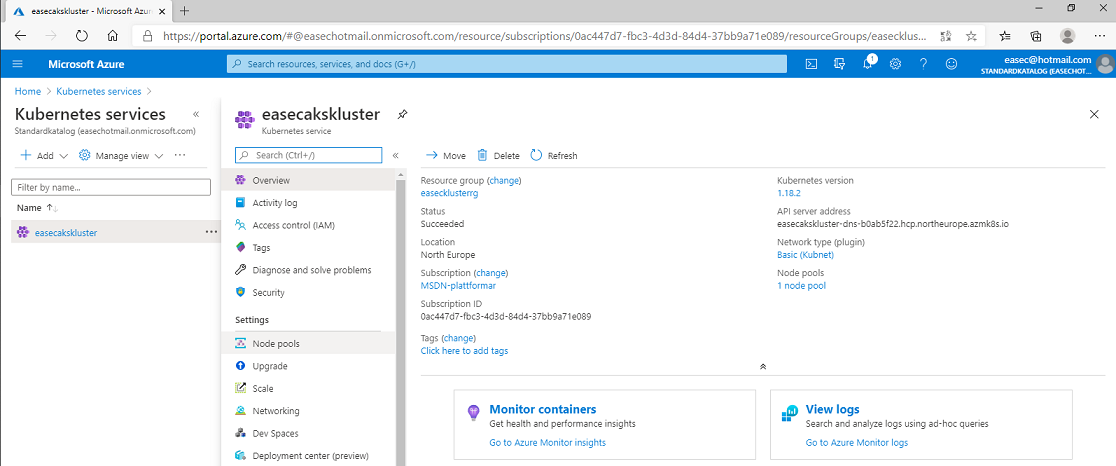
Denna inspelade demonstration visar hur du skapar ett kluster för Kubernetes i AKS. I demonstrationen visar jag hur du skapar klustret via portal, men du kan även göra detta via exempelvis Cloud Shell:
az aks create \
--resource-group <namn_för_resursgrupp> \
--name <namn_för_kluster> \
--vm-set-type VirtualMachineScaleSets \
--node-count <antal_noder> \
--generate-ssh-keys \
--kubernetes-version <versionsnummer> \
--load-balancer-sku standard
Demonstrationen finns med i .easec:s kurser: Orkestrering i Docker och Azure för administratören.
Förutsättning: PowerShell 7.x och Azure Az module installerat.
Arbetsuppgift 1: Logga på Azure AD
1. Klicka på Start och skriv in PowerShell, högerklicka på ikon för PowerShell 7.x och välj Run as administrator.
2. I fönstret User Account Control, klicka på Yes.

3. Skriv in följande kommando och klicka på Enter:
Connect-AzAccount
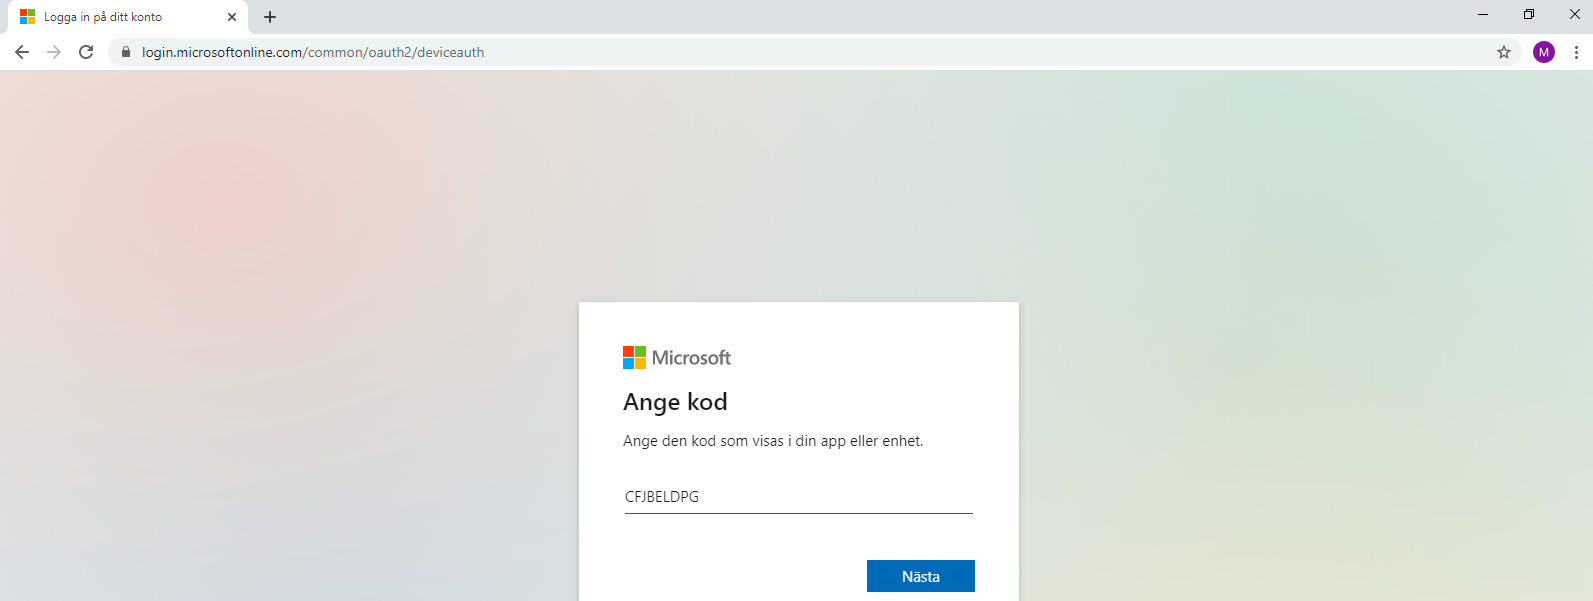
3. Kommandot kommer att generera en kod, öppna webbsidan med följande URL: https://microsoft.com/devicelogin och skriv in koden, klicka på Nästa.
4. Logga på som administratör för Azure AD.
5. Efter inloggningen, kan du stänga webbläsaren.
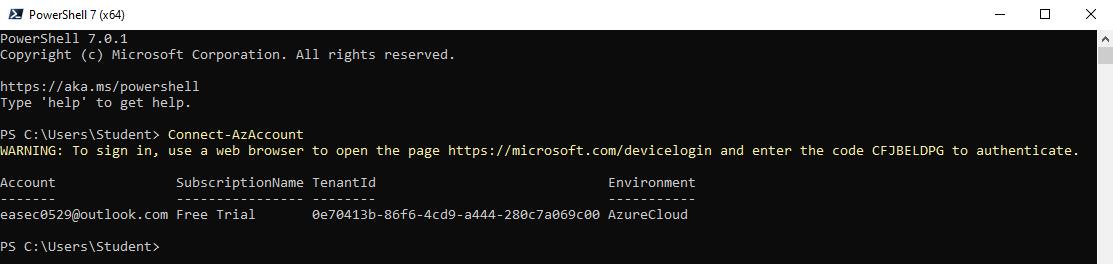
6. Återgå till fönstret med PowerShell 7.
Arbetsuppgift 2: Lista användare
1. I fönstret för PowerShell 7, skriv in följande kommando och klicka på Enter, för att lista användarekonto i Azure Active Directory:
Get-AzADUser
Notera referens till domän i referens för User Principal Name. Du kommer att använda denna referens i de olika kommandona som följer!
I mitt exempel är det: easec0529outlook.onmicrosoft.com, jag har inte lagt till skräddarsydd domän.
Arbetsuppgift 3: Skapa användare

1. I fönstret för PowerShell 7, skriv in följande kommando och klicka på Enter, för att sätta ett lösenord:
$SecureStringPassword = ConvertTo-SecureString -String "Pa55w.rd!" -AsPlainText -Force
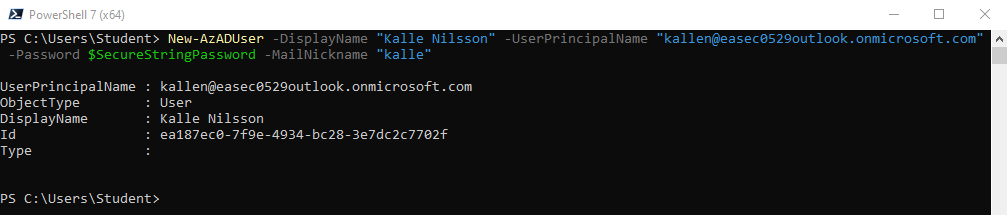
2. I fönstret för PowerShell 7, skriv in följande kommando och klicka på Enter, för att skapa ny användare:
New-AzADUser -DisplayName "Kalle Nilsson" -UserPrincipalName "kallen@<ditt_domännamn_i_Azure_AD>" -Password $SecureStringPassword -MailNickname "kalle"
Arbetsuppgift 4: Skapa grupp
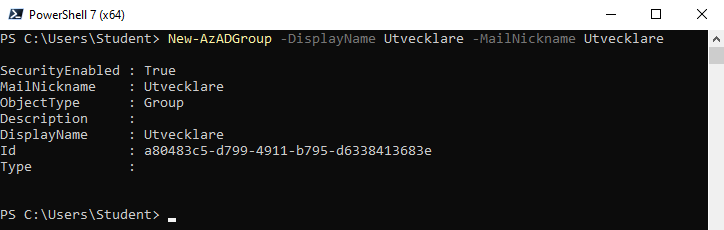
1. I fönstret för PowerShell 7, skriv in följande kommando och klicka på Enter, för att sätta ett lösenord:
New-AzADGroup -DisplayName Utvecklare -MailNickname Utvecklare
Arbetsuppgift 5: Lägga till användare i grupp
Lägga till användare i gruppen, innehåller tre moment: skapa variabel som innehåller information om grupp, skapa variabel som innehåller information om specifik användare, uppdatera medlemskapet.

1. I fönstret för PowerShell 7, skriv in följande kommando och klicka på Enter, för att lägga information om grupp i en variabel:
$ObjectGroup = Get-AzADGroup -SearchString “Utvecklare”

2. I fönstret för PowerShell 7, skriv in följande kommando och klicka på Enter, för att lägga information om användare i variabel:
$ObjectUser = Get-AzADUser -ObjectId kallen@<ditt_domännamn_i_Azure_AD>

3. I fönstret för PowerShell 7, skriv in följande kommando och klicka på Enter, för att lägga till användare till specifik grupp:
Add-AzADGroupMember -MemberObjectId $ObjectUser.Id -TargetGroupObjectId $ObjectGroup.Id
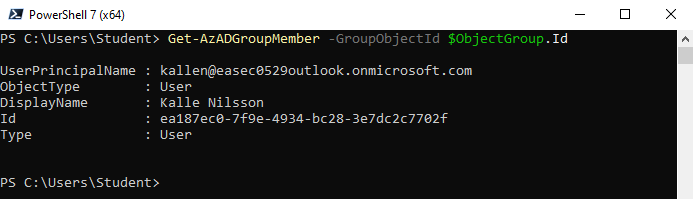
4. I fönstret för PowerShell 7, skriv in följande kommando och klicka på Enter, för att verifiera att användare har lagts till:
Get-AzADGroupMember -GroupObjectId $ObjectGroup.Id
Förutsättning: PowerShell 7.x installerat.
Arbetsuppgift 1: Installera Az module
1. Klicka på Start och skriv in PowerShell, högerklicka på ikon för PowerShell 7.x och välj Run as administrator.
2. I fönstret User Account Control, klicka på Yes.
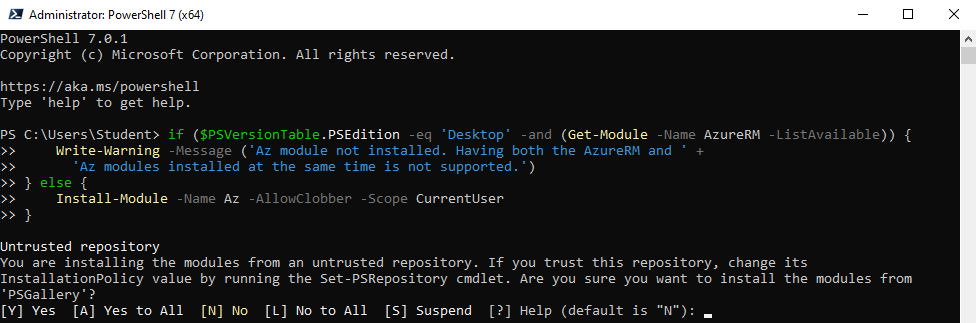
3. I dialogfönstret Administrator: PowerShell 7 (x64) skriv in följande kommando och klicka på Enter:
if ($PSVersionTable.PSEdition -eq 'Desktop' -and (Get-Module -Name AzureRM -ListAvailable)) {
Write-Warning -Message ('Az module not installed. Having both the AzureRM and ' +
'Az modules installed at the same time is not supported.')
} else {
Install-Module -Name Az -AllowClobber -Scope CurrentUser
}
Skriv in ett Y för att bekräfta att du vill installera från ett icke betrott förråd.