Inlägg i blogg av Mats Johannesson
The goal for this information and my book, is to get you up and running Kubernetes. The recommended way, is to read the information in this order:
1. Overview (this blog entry): to get overview about control plane.
2. Pod(Pods): to get information about pod (to be posted).
3. kubectl: the CLI tool to handle the cluster (to be posted).
4. Service: to get information about service and how to work with these (to be posted).
5. Namespaces: to get information about namespaces and how to work with namespaces to isolate resources on the cluster (to be posted).
6. Helm: to get information about Helm (to be posted).
7. Managed Services (Cloud): to get information about managed services for Kubernetes in the Cloud (Azure, GCP and aws) (to be posted).
Overview
Kubernetes is a portable, extensible, open-source platform for managing containerized workloads and services, that facilitates both declarative configuration and automation. It has a large, rapidly growing ecosystem. Kubernetes services, support, and tools are widely available.
The name Kubernetes originates from Greek, meaning helmsman or pilot. K8s as an abbreviation result from counting the eight letters between the "K" and the "s". Google open-sourced the Kubernetes project in 2014. Kubernetes combines over 15 years of Google's experience running production workloads at scale with best-of-breed ideas and practices from the community.
Components
When you deploy Kubernetes, you get a cluster.
A Kubernetes cluster consists of a set of worker machines, called nodes, that run containerized applications. Every cluster has at least one worker node.
The worker node(s) host the Pods that are the components of the application workload. The control plane manages the worker nodes and the Pods in the cluster. In production environments, the control plane usually runs across multiple computers and a cluster usually runs multiple nodes, providing fault-tolerance and high availability.
The control plane's components make global decisions about the cluster (for example, scheduling), as well as detecting and responding to cluster events (for example, starting up a new pod when a deployment's replicas field is unsatisfied). Kubernetes use Desired State Configuration, it compares desired configuration against the running configuration, and make changes when the desired configuration is not satisfied.
Control plane components can be run on any machine in the cluster. However, for simplicity, set up scripts typically start all control plane components on the same machine, and do not run user containers on these machines. Components for control plane are: API server, etcd, scheduler, and controller-manager.
API server
The API server is a component of the Kubernetes control plane that exposes the Kubernetes API. The API server is the front end for the Kubernetes control plane.
The main implementation of a Kubernetes API server is API server. API server is designed to scale horizontally—that is, it scales by deploying more instances. You can run several instances of API server and balance traffic between those instances.
etcd
Consistent and highly available key value store used as Kubernetes' backing store for all cluster data. etcd is used as a Single Source of Truth (SSOT). In production it´s vital to provide fault-tolerance and high availability for etcd. At least, use three (3) machines for etcd.
Scheduler
Control plane component that watches for newly created Pods with no assigned node and selects a node for them to run on. It attempts to reach the desired state as per etcd values from current state.
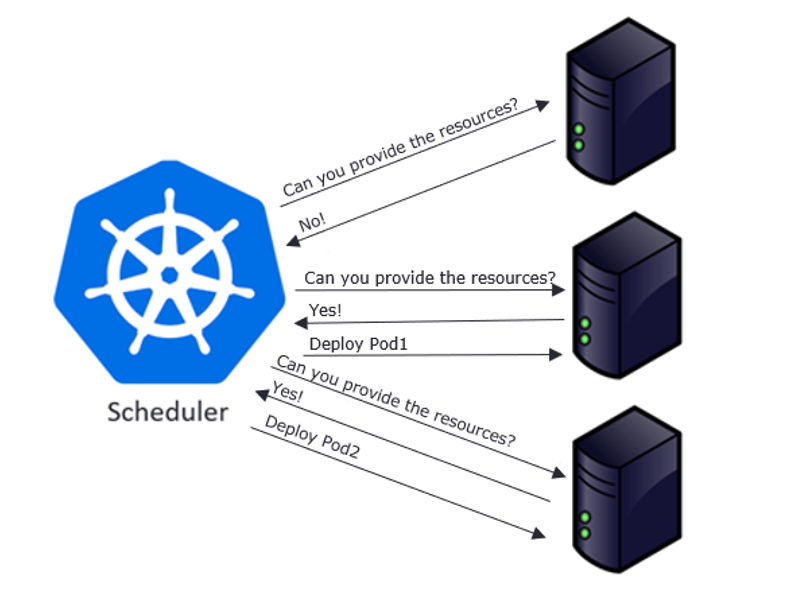
Factors considered for scheduling decisions include individual and collective resource requirements, hardware/software/policy constraints, affinity and anti-affinity specifications, data locality, inter-workload interference, and deadlines.
Scheduling starts with finding suitable nodes that have resources that can host a pod. For example, if a pod has specific sets of requirements in terms of CPU and Memory passed in the request, then only those nodes will be selected that have these requirements. This is handled by a set of predicates which execute in chain filtering nodes for each given parameter, like ports, hostname, resources, node pressure in terms of processes and CPU usage.
As nodes get evaluated against the parameters, each node gets a ranking showing their suitability, with the highest-ranking node finally getting selected. Once node is selected a binding object is created which has namespace, pod name and uid with reference to the node selected. This binding object then ends up getting sent to API Server via a POST. Once the API Server receives this request it updates the etcd entry for the pod object with the given node name and changes the PodScheduled to true. Once this update is done, it’s time to get the pod running on a worker node.
At this point the object exists in etcd with no actual physical resources assigned. Next the object will be sent over to the set of nodes referenced to the object in etcd. This is done by a pull mechanism executed by kublet.
Limits and request
A pod in Kubernetes can freely consume resources, such as CPU and memory, from the underlying system. But that doesn't mean it should.
IT teams define limits that restrict pods from using all the resources of the system. That way, there isn't any unfair distribution of resources across applications running on the pods.
To understand these configurable constraints, first let's examine requests and limits in Kubernetes. Both are applied at the pod level. The Kubernetes scheduler uses this information to determine where to place a pod.
- A request is the minimum resources a container needs on a node to function properly. If there aren't nodes with sufficient resources to meet these requests, the pod won't be created.
- A limit sets the maximum amount of a resource that a container can use. If a container consumes more than its limit, then it's either throttled down (in the case of CPU) or the container is terminated (in the case of memory). Limits ensure containers don't consume more resource than they're assigned, which leads to resource exhaustion
Choosing practical requests and limits
Setting requests and limits correctly is critical to the Kubernetes cluster. But setting pragmatic Kubernetes requests and limits is not a straightforward task. It can also be unpredictable.
Use trial and error to determine the appropriate limitations. There can't be a one-size-fits-all or optimal value for all containers. Resource consumption depends on the application and varies on a case-by-case basis.
Ideally, maintain a 20% to 30% margin during request setup so that, even if slightly more resources are required than allocated, it can be managed easily. But don't overcommit resources, as it can result in performance bottlenecks on the node.
Setting requests and limits
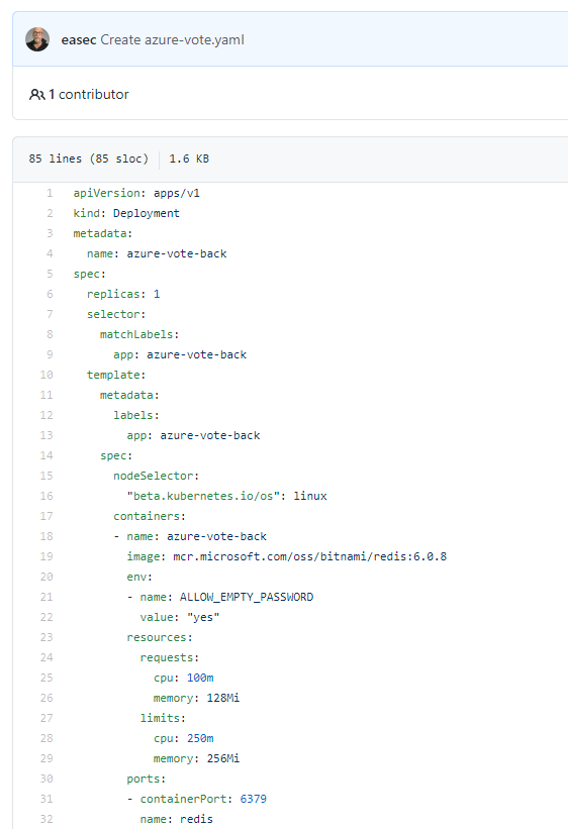
Setting up Kubernetes requests and limits on pods is as simple as applying the pod configuration file below, with requests and limits set for CPUs in "millicpu" and for memory in "MiB."
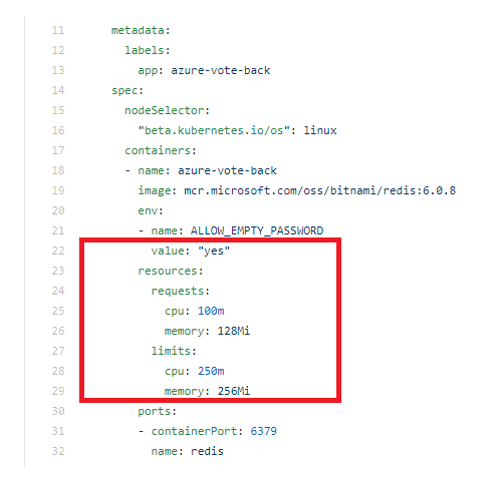
To apply these settings, use following command:
kubectl apply -f <name_for_yaml file> --namespace=<name_for_namespace>
For more information about namespace, see the section Namespaces.
Deault requests and limits
Developers should set their own resource requests and limits. But sometimes they either over-provision resources for containers out of an abundance of caution or forget to set requests and limits altogether. Therefore, Kubernetes cluster administrators should enforce requests and limits on a Kubernetes namespace level. This ensures that, as soon as a container is created in the namespace, resource bounds are applied to them automatically.
There are two ways to control resource consumption on a Kubernetes namespace: Resource Quotas and Limit Ranges. For more information about namespace, see the post for Namespaces.
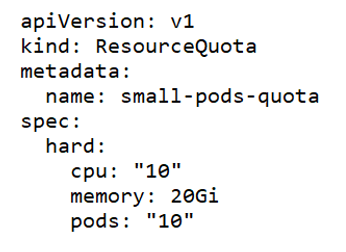
Resource Quotas
A ResourceQuota limits the total resource consumption of a namespace. For example, in the following YAML configuration, the namespace has a hard limit of 10 CPUs, 20 Gi of memory and 10 pods.
Limit Ranges
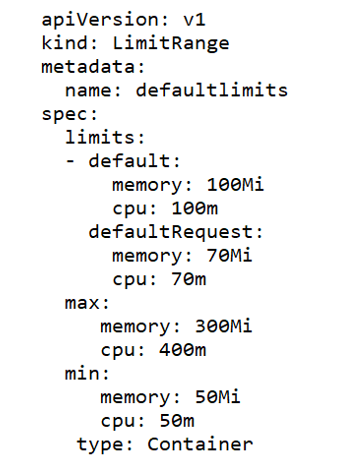
LimitRange objects manage constraints at a pod/container level, and the configurations are applied on individual containers, rather than across all resources in a namespace. If a container doesn't specify its own container limit, then a "LimitRange" object will apply default requests and limits, which are restricted by the ResourceQuota at the namespace level.
LimitRange objects are defined as shown in the following example YAML configuration, where "max" and "min" sections cover the maximum and minimum limits of resources. The "default" section configures containers with these default limits, if not explicitly specified otherwise. Finally, the "defaultRequest" section controls the assignment of default request values for the container, if not defined already.
Controller-manager
Controller-manager is a Control Plane component that runs controller processes.
Logically, each controller is a separate process, but to reduce complexity, they are all compiled into a single binary and run in a single process.
Some types of these controllers are:
- Node controller: Responsible for noticing and responding when nodes go down.
- Job controller: Watches for Job objects that represent one-off tasks, then creates Pods to run those tasks to completion.
- Endpoint’s controller: Populates the Endpoints object (that is, joins Services & Pods).
- Service Account & Token controllers: Create default accounts and API access tokens for new namespaces.
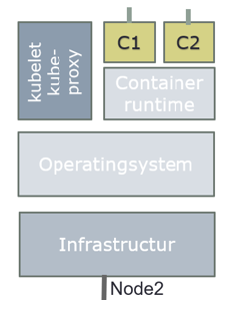
Node Components
Node components run on every node, maintaining running pods and providing the Kubernetes runtime environment.
kubelet
An agent that runs on each node in the cluster. It makes sure that containers are running in a Pod.
The kubelet takes a set of PodSpecs that are provided through various mechanisms and ensures that the containers described in those PodSpecs are running and healthy. The kubelet doesn't manage containers which were not created by Kubernetes.
Example:
kublet polls API Server for pods bound to the node it is running on by default every 20 seconds. If it detects a change compared to its own state, it begins to synchronize to the new state.
It works through following steps:
1. If it’s a new pod, register it and publish startup metrics.
2. Generate a pod status object with possible values like Pending, Running, Succeeded, Failed and Unknown, as these represent the states a pod can be in. It is determined by running pod specs to through a chain of PodSyncHandlers. Each handler checks if pod should run on the node or not. If any one of these fails, the pod will transition to evicted state.
3. Upon generation of Pod status, it will be sent to etcd for updating. Pod is then running through a set of node level admission handlers like AppArmor profiles and privilege evaluations.
4. If pod has specific cgroup requirements, these will be enforced and attached to the pod.
5. Data directories are then created for pod data, volumes, and related plugins.
6. Any volumes required will be created and attached.
7. Secrets, if needed, are pulled from API server, and made available for injection into the pod.
8. Image-related info such as secrets and url is gathered and made available for the container runtime to execute.
9. Finally, all this info is passed to container runtime to actually run the container.
The time has now come to make our container live by making it run on the physical resources. This is achieved by invoking CRI (Container Runtime Interface), which is an interface layer between Kubernetes and container runtimes, such as docker, containerd, rkt and more.
kube-proxy
kube-proxy is a network proxy that runs on each node in your cluster, implementing part of the Kubernetes Service concept. kube-proxy maintains network rules on nodes. These network rules allow network communication to your Pods from network sessions inside or outside of your cluster. kube-proxy uses the operating system packet filtering layer if there is one and it's available. Otherwise, kube-proxy forwards the traffic itself.
Container runtime
The container runtime is the software that is responsible for running containers.
Kubernetes supports several container runtimes: Docker, containerd, CRI-O, and any implementation of the Kubernetes CRI (Container Runtime Interface).
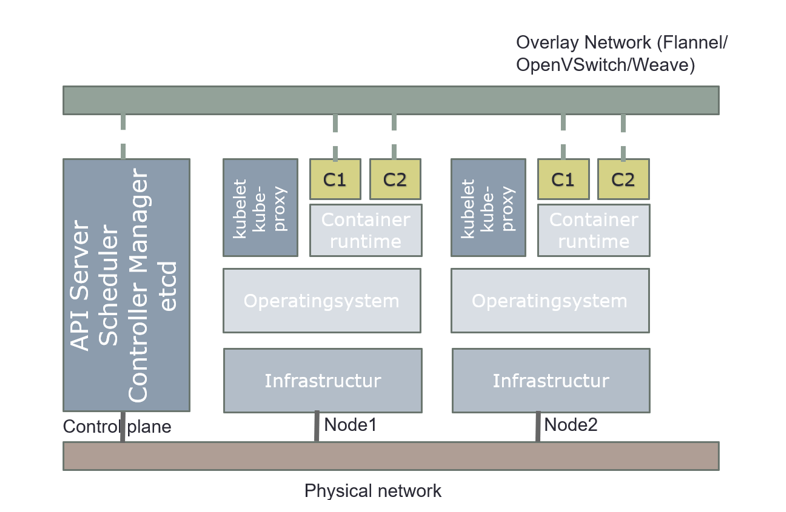
Overview how everything is connected in Kubernetes
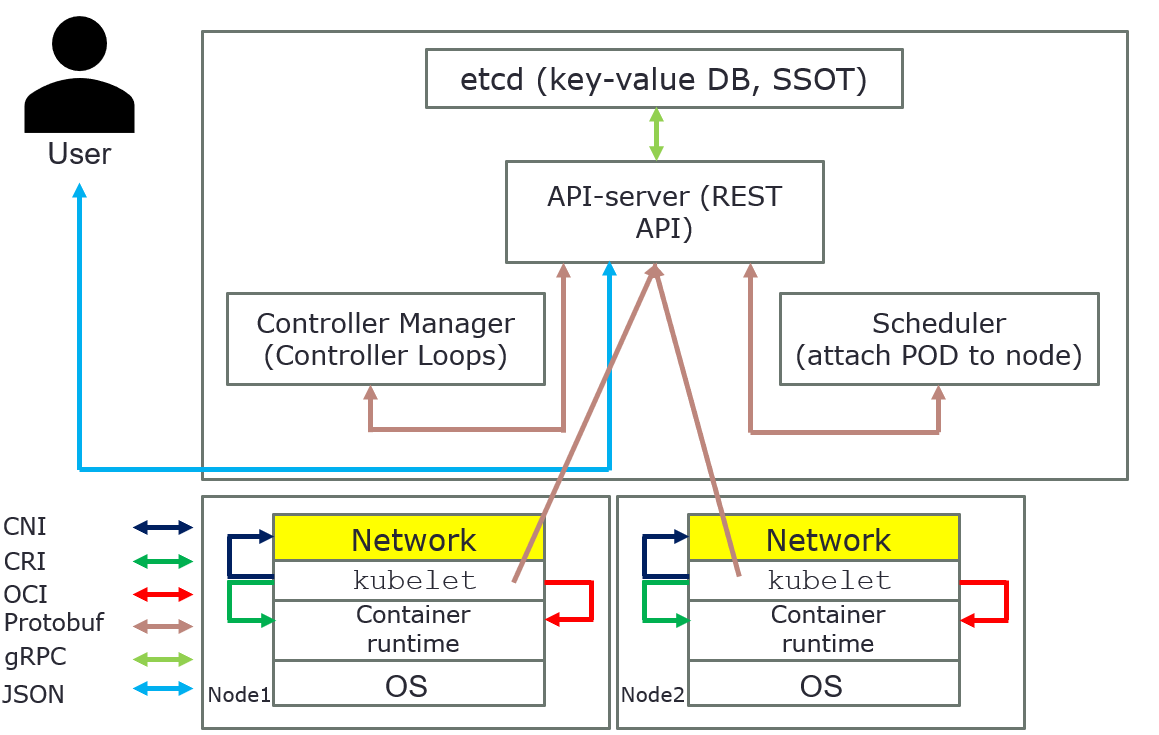
The above pictures are just for an overview, it´s show how everything is connected in Kubernetes.